When to Harvest Cannabis: The Complete Guide - The Right Time
Harvesting Cannabis: When to Harvest - The Right Time - A Guide to Trichomes and How to Get the Most Out of Your Plants
Updated: June 2026 | When to Harvest Cannabis – The Right Time to Harvest Cannabis
Author: Cannapot Grow Team | Reading time: approximately sixteen minutes
The Most Important Things at a Glance
✓ The color of the trichomes is the only truly reliable harvest indicator – pistils and yellowing leaves are merely supporting signs, not the deciding factor.
✓ The optimal harvest window for most growers is when 80–90% of the trichomes are milky white and 10–20% have turned amber on the calyxes.
✓ Harvesting too early reduces both potency and yield. Harvesting too late causes THC to gradually convert into CBN, shifting the effects toward heavier sedation.
✓ A 48–72-hour dark period before harvest is commonly used to maximize resin production at the time of cutting.
✓ Autoflowering, feminized, regular, and CBD seeds each have their own harvest timing considerations, all of which are discussed in detail below.
✓ Drying at 20°C / 60% RH for 7–14 days, followed by a 4–8-week curing period in glass jars, can significantly improve the quality of your harvest.
Why Harvest Timing Is the Most Important Decision in Your Grow
You can choose perfect genetics, dial in your nutrients, maintain ideal temperature and humidity for twelve weeks straight - and still ruin most of that hard work at the very end by harvesting at the wrong moment. Harvest timing is not a minor detail. It is the final, decisive variable that determines potency, flavour, aroma, and the overall effect of everything you have grown.
The cannabis plant is running a biological clock during its final weeks. Inside the trichomes - the tiny, mushroom-shaped resin glands covering your buds - the plant is producing and accumulating cannabinoids, primarily THC (tetrahydrocannabinol) and CBD (cannabidiol), along with terpenes responsible for aroma and flavour. This biosynthesis process continues right up to a peak, then begins to reverse. THC slowly degrades enzymatically into CBN (cannabinol), a mildly sedative compound with roughly one-tenth of THC's psychoactive potency. Terpenes - which are highly volatile organic compounds - also evaporate progressively as the plant over-ripens.
The window where cannabinoids and terpenes are simultaneously at their peak is real, and it is not infinite. Research into cannabis biosynthesis has confirmed that THCA (the acid precursor to THC) accumulates to its maximum in the capitate-stalked trichome heads during late flowering, before gradually degrading. This is exactly what you are reading when you inspect trichomes - the colour change reflects real chemical changes happening inside the resin head. Understanding where this window sits for your specific plants, your specific genetics, and your growing environment is what separates a good harvest from a genuinely great one. The plant tells you when it is ready - you just need to know what to look for.
To understand where harvest fits in the bigger picture, it helps to be familiar with the full cannabis growth cycle and particularly the late stages of the cannabis flowering stage, where the plant's final ripening takes place.
The Three Visual Signals to Watch
There is no single moment when a cannabis plant raises its hand and declares itself ready. Instead, the plant gives you a cluster of overlapping signals. Reading them together gives you confidence. Relying on just one of them leads to mistakes.
Here are the three visual signals, listed in order of reliability:
- Trichome colour - the only truly reliable and scientifically meaningful indicator. Requires magnification. Non-negotiable.
- Pistil colour and curl - a solid supporting signal, visible without magnification. Cross-check, never use alone.
- Fan leaf yellowing and overall plant fade - a contextual signal confirming the plant is completing its life cycle.
The essential principle: never chop based on one signal alone. When all three align - milky trichomes with some amber, mostly darkened and curled pistils, fading fan leaves - you are confidently in the harvest window. When they conflict, always trust the trichomes.
Reading Trichomes: The Definitive Method
Trichomes are the tiny, crystal-like outgrowths that cover your buds and surrounding sugar leaves. Under magnification they look like miniature mushrooms - a stalk topped with a round, bulbous head. It is inside those heads (capitate-stalked glandular trichomes) that your plant concentrates THCA, CBDA, terpenes, and the other cannabinoids that make your harvest what it is. The stalk trichomes contain very little.
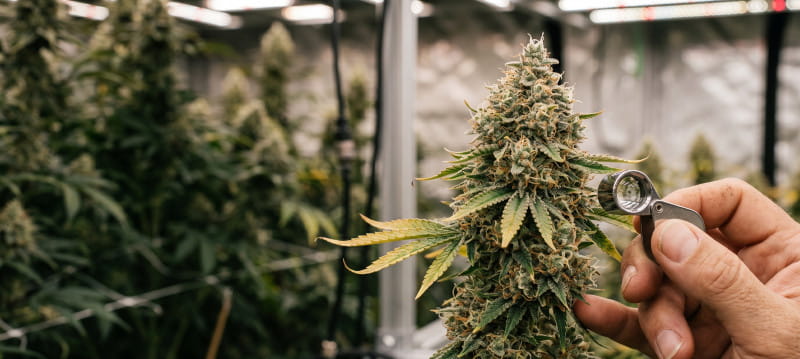
To inspect trichomes properly, you need magnification. The naked eye cannot give you the colour detail you need. A jeweler's loupe at 30-60x magnification is the most practical tool - affordable, portable, and effective for on-the-plant inspection. A digital microscope (60-100x, designed for smartphones) gives you better clarity and lets you photograph trichomes over time to track their progression day by day. A pocket magnifier of 20x or less will not show you enough detail to make a reliable call.
The Three Trichome Stages
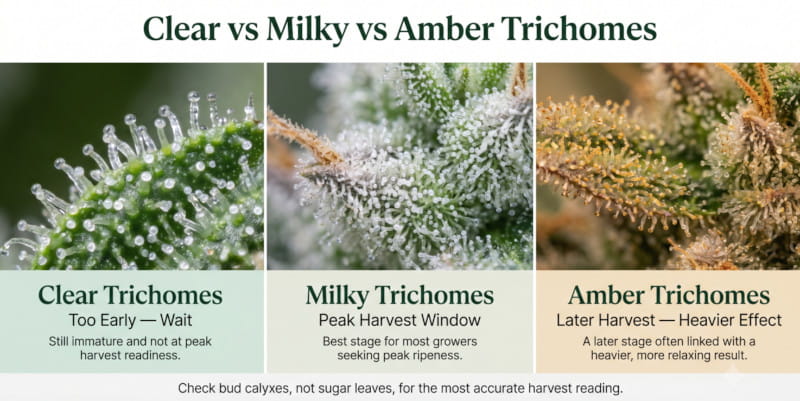
Clear / Transparent
The trichome head is glassy and see-through. The plant is still actively synthesising cannabinoids. THCA content is immature and accumulating. Harvesting now produces weak, racy, anxious effects with significantly reduced yield.
Not ready - wait
Milky / Cloudy White
The trichome head turns opaque - like frosted glass. THCA has reached peak concentration. Maximum cannabinoid density. Effects are energetic, cerebral, and euphoric. The sweet spot for most growers begins here.
Peak potency
Amber / Golden
THCA is degrading into CBN. The resin takes on a warm golden-brown tone. Effects shift toward heavier body relaxation and sedation. Deliberately targeting this stage produces a deeply relaxing, couch-lock type effect.
Heavier, sedative
What Percentage to Aim For
The precise ratio you target depends entirely on the effect you are after. Here are the three most practically useful benchmarks:
- All milky, 0% amber - peak THCA/THC, uplifting, cerebral, energetic. Best for daytime effect strains and those seeking maximum psychoactive intensity. Ideal for sativa-dominant varieties like Special Original Haze, Western Winds or Headbanger.
- 80-90% milky, 10-20% amber - the most popular sweet spot for the majority of growers. Balanced potency with a slightly rounded, relaxing edge. The target for most indica-dominant and hybrid strains including Bruce Banner #3, White Widow, and Critical varieties.
- 50-60% milky, 40-50% amber - heavier body effect, deeper relaxation, stronger sedation. Suitable for those seeking physical comfort, sleep support, or a deeply calming effect. Often chosen for indica heavyweights like Northern Lights or Granddaddy Purple.
The Science Behind Trichome Colour
The colour change in trichome heads reflects real biochemical changes. Clear trichomes are still accumulating THCA via the plant's MEP biosynthesis pathway. As the head fills completely with resin, it turns milky white - the opacity is caused by the dense packing of cannabinoid and terpenoid compounds. Amber colouration occurs as THCA undergoes non-enzymatic oxidative degradation to CBN. This is why the colour shift is the most reliable signal available to a grower without laboratory testing equipment.
How to Inspect Properly
Take a small piece of bud - a single sugar leaf or a side branch tip - and hold it still under your loupe or microscope in good, natural or LED lighting. Move the magnifier until trichomes come into sharp focus. You are looking at the round heads specifically, not the stalks. Count or estimate the ratio of clear, milky, and amber heads across at least 20-30 trichome heads, then compare against the percentages above. Do this every two to three days during the final two to three weeks of flowering to track the progression in real time - it moves faster than most beginners expect.
Cannapot Grow Tip
Always inspect trichomes on the bud calyxes themselves, not on the sugar leaves. Trichomes on sugar leaves mature and amber significantly faster than those on the actual flower. Checking leaves will tell you the plant is done when it may have another week to go. Get your magnifier directly on the calyx tissue for an accurate reading.
Pistil Colour: The Supporting Signal
Pistils are the fine, hair-like structures that emerge from your bud sites during the flowering stage. They start as bright white filaments reaching outward - their biological function is to catch airborne pollen from male plants. In a sinsemilla (seedless) grow, they never receive pollen, and over time they mature, curl inward, and change colour through orange, red, and finally brown as the plant ages.
Pistil colour change is visible without any magnification, making it the most accessible first-pass indicator of where your plant stands. Here is how to read it:
- Mostly white, reaching outward - early to mid-flowering. Not ready. Weeks remaining.
- 50-60% darkened (orange, red, or brown) - entering the harvest window territory. Many growers wait for more darkening unless specifically seeking a lighter, more uplifting effect.
- 70-80% darkened and curled inward - solidly within the optimal harvest window for most strains. Always cross-check with a trichome inspection before cutting.
- 90%+ darkened - late harvest. If trichomes are also mostly amber, the plant is past its peak potency window. Still usable, but THC has been degrading.
Critical Limitation - Read This
Never rely on pistils alone as your harvest trigger. Sativa dominant strains like Colombian Thai and Haze genetics commonly continue pushing out fresh white pistils even when their trichomes are fully mature and beginning to amber. If you harvest these strains based on pistil colour, you will routinely cut them late. Certain tropical genetics also behave this way. The pistil check is a useful cross-reference - never the final word. Always confirm with trichomes.
Fan Leaf Yellowing and Other Signs
As the cannabis plant reaches the final weeks of its life cycle, it begins to cannibalise its own stored nutrients to fuel the final push of bud development and seed production. The large fan leaves, no longer prioritised by the plant, begin to yellow from the bottom of the plant upward as nitrogen is mobilised and redirected - a process growers call "the fade." This is natural, expected, and in fact a sign of a healthy, completing plant. It is not a deficiency. Do not add more nitrogen to correct it. Along with yellowing fan leaves, watch for these additional contextual signals in the final weeks:
- Swollen calyxes - the small, teardrop-shaped bracts making up the bud structure become noticeably fatter and rounder as ripeness peaks. This calyx swelling is caused by THCA crystal accumulation inside the tissue.
- Reduced water uptake - the plant drinks noticeably less in the final one to two weeks. The medium stays moist longer. This is the plant signalling the end of its active growth phase.
- Intensified aroma - terpene production peaks in the final weeks. A sudden, sharper increase in fragrance - particularly of myrcene, limonene, or caryophyllene - is a positive ripeness signal.
- Colour changes in the bud itself - genetics expressing anthocyanins (purples, reds, pinks) will often show their colours most intensely in the final two weeks as temperatures drop and sugar metabolism changes.
- Resin visibility on outer surfaces - in some high-resin strains, the trichomes become so dense that the buds appear visibly frosty and sticky even from a distance. A perfect example is the strain called Jealousy.
These signals together with trichome and pistil checks give you a complete picture. None alone is sufficient - but when all point the same direction, you can cut with confidence.
Harvest Timing and Your Desired Effect
One of the genuinely underappreciated aspects of harvesting is that you have real control over the effect profile of your final product simply by choosing when to cut. The timing decision is not just about "is it ready" - it is also about "ready for what effect." This is not a minor nuance. The difference between harvesting at all-milky versus 50% amber can produce a noticeably different experience from the same genetics.
|
Trichome Profile |
Primary Effect |
Best for |
|
All clear (too early) |
Racy, anxious, weak, low THC |
Not recommended for any purpose |
|
All milky, 0% amber |
Euphoric, cerebral, energetic, maximum THC |
Daytime use, creative work, social settings, sativa strains |
|
80-90% milky, 10-20% amber |
Balanced, potent, slightly relaxing body component |
Most growers - the best all-round harvest point for hybrids and indicas |
|
50% milky, 50% amber |
Heavy body effect, deep relaxation, reduced head high |
Evening use, stress relief, muscular tension, physical discomfort |
|
Mostly amber (over-ripe) |
Sedative, couch-lock, sleepy, high CBN |
Sleep support, those specifically seeking heavy sedation |
This relationship between trichome ripeness and effect is grounded in real chemistry. THC (converted from THCA during decarboxylation) at peak concentration produces the classic euphoric, energetic experience most users associate with cannabis. As THC oxidatively degrades into CBN, the experience shifts progressively toward sedation and physical heaviness. CBN is not without value - it has been studied for its potential sleep-supporting properties - but if you are growing a strain prized for its uplifting cerebral effect, letting it over-ripen means never experiencing what the genetics were actually capable of.
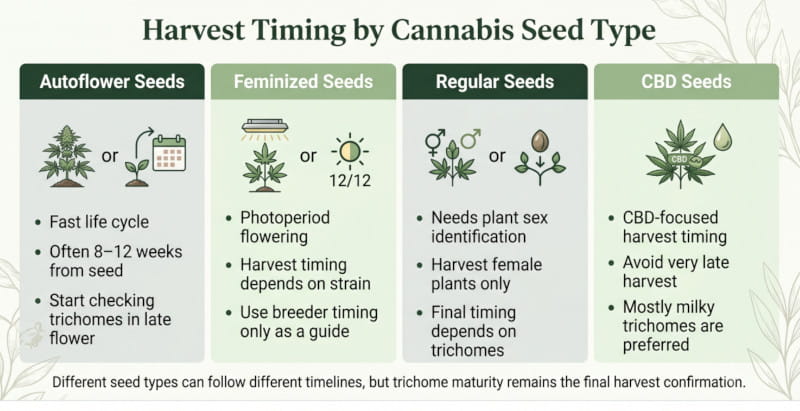
Harvest Timing by Seed and Plant Type
This is where most general harvesting guides fall short. The trichome method applies universally - but the signals leading up to harvest, the expected timeline, and the practical considerations differ significantly depending on the type of seeds you planted. At Cannapot, we have been working with cannabis genetics since 2004, and one of the clearest lessons from over two decades of experience is that seed type shapes everything, including how you approach harvest.
|
Seed Type |
Harvest Trigger |
Typical Timeline |
Key Consideration |
Shop |
|
Autoflower |
Internal biological clock - trichomes are your only reliable signal |
8-12 weeks seed to harvest |
No light schedule change possible. Fixed timeline. Start checking trichomes from week 7 onwards. Do not delay past full amber - the plant is done. |
|
|
Feminized (photoperiod) |
12/12 light cycle triggers flowering. Breeder's stated week is a starting point only. |
7-14 weeks of flowering depending on strain |
Breeder's timeline is produced under ideal commercial conditions. Your environment will vary. Check trichomes in the final 2 weeks, not on a fixed calendar date. Sativa genetics often run 2-3 weeks longer than stated. |
|
|
Regular seeds |
Same as photoperiod feminized - 12/12 light dependent |
Similar to feminized - strain dependent |
Identify and remove all male plants during early flowering (weeks 2-3) before pollen sacs open. A single missed male pollinates an entire crop, producing seeded buds. Harvest timing follows the surviving female plants. For this, check our Canna Wiki "How to identify male and female cannabis plants". |
|
|
CBD seeds |
Same visual signals - but target an earlier trichome window than high-THC strains |
Strain dependent - typically similar to feminized photoperiod |
To maximise CBD and minimise THC, target mostly milky trichomes with very few amber. Later harvests degrade CBD alongside THC into CBN, reducing therapeutic value. Earlier is better for CBD-forward genetics. |
A Special Note on Autoflowers
Autoflowering plants deserve particular attention because they operate on a fundamentally different model from every other seed type. Unlike photoperiod plants, which flower only when you shift their light cycle to 12/12, autoflowers begin flowering based on their internal genetic programming - typically around 3-4 weeks after germination, regardless of light schedule. This means you can run them on 18/6 or even 20/4 light schedules throughout their entire life. The consequence for harvesting is significant: you cannot extend their vegetative phase to give them more time, and you cannot delay flowering to let them bulk up. Every week counts in an auto's lifecycle. The harvest window arrives faster than most beginners expect, and when an autoflower is done, it is done - letting it sit past full trichome ripeness gains you nothing and costs you quality. Start checking trichomes from around week 7 onwards without fail. Some fast-finishing varieties - particularly those with strong Ruderalis influence - are genuinely ready at week 8-9. Others need the full 11-12 weeks.
For a full week-by-week breakdown of the autoflower lifecycle, our dedicated growing autoflowering cannabis guide covers everything in depth.
Harvest Windows for Common Strains
General timing principles are useful, but real-world harvest planning benefits from knowing how specific, popular genetics actually behave at harvest time. The examples below draw on commonly reported harvest experiences for well-known strain families. Your specific phenotype and growing conditions will influence the exact window - use these as starting points for when to begin your trichome inspections, not as hard cut dates.
Indica dominant Hybrid
OG Kush
Typically runs 8-9 weeks of flowering. Trichomes develop rapidly in the final two weeks. Harvesting at 80% milky / 20% amber delivers the classic fuel-and-earth aroma with heavy relaxation. Going further amber produces a noticeably couch-locking result.
Check trichomes: week 7 onwards
Sativa dominant
Special Original Haze
A long-flowering Haze genetic running 12-13 weeks. Continues throwing white pistils well into late flowering - do not rely on pistils here. Trichomes are the only reliable signal. Harvest all-milky for the clearest, most cerebral effect this strain is known for.
Check trichomes: week 10 onwards
Indica Classic
Northern Lights
One of the fastest-finishing indica classics at 7-8 weeks of flowering. Trichomes amber quickly in the final week. Many growers target 70% milky / 30% amber for Northern Lights to bring out the full body-heavy, relaxing effect the strain is cultivated for.
Check trichomes: week 6 onwards
Autoflower
Girl Scout Cookies Auto
A modern high-potency autoflower finishing at 9-10 weeks from seed. Resin production is dense and trichomes can be hard to read without a digital microscope. Check the bud calyxes specifically - sugar leaves amber early and mislead. Target 85% milky for this genetics.
Check trichomes: week 7 onwards
CBD Dominant
CBG Kush / CBD Therapy
CBD-dominant strains should be harvested earlier in the trichome window than high-THC genetics - target all-milky or a maximum of 5-10% amber. Over-ripening these varieties degrades CBD alongside THC, reducing the therapeutic cannabinoid profile significantly.
Check trichomes: week 7 onwards
Indica dominant Hybrid
White Widow
A classic resin-heavy hybrid finishing at 8-9 weeks. Famous for exceptional trichome production - comparatively easy to inspect due to the sheer density of resin. Harvest at 80% milky / 20% amber for the balanced, potent high this legendary strain delivers.
Check trichomes: week 7 onwards
Cannapot Grow Tip
Never treat a breeder's stated flowering time as a harvest date. Flowering times are measured under controlled commercial conditions with optimal nutrients, CO2, and light intensity. Real-world grows almost always run 1-2 weeks longer. Use the stated week as a trigger for when to begin checking trichomes, then let the trichomes tell you when to actually cut.
Indoor vs Outdoor Harvest Difference
Indoor Harvesting
Indoor growers have a significant advantage: complete environmental control. Temperature, humidity, light cycles, and airflow are all managed, which means the harvest window is predictable and can be approached methodically. Please check the Canna Wiki Guide "Growing cannabis indoors" to get more detailed informations. The best time to actually cut your plants indoors is early morning, before the lights turn on. Terpene levels are at their highest during the dark period when the plant has not been exposed to heat and light from the lamps - harvesting at this point preserves more of the aromatic volatile compounds in your final product.
Indoor grows also benefit from the flexibility of multiple harvests per year - particularly with autoflowering genetics, which can be cycled 3-4 times in the same period it takes to complete a single photoperiod crop from start to finish.
Outdoor Harvesting
Outdoor growers work within a different set of constraints. In the Northern Hemisphere, the outdoor harvest window for photoperiod varieties typically falls between late September and early November - the period growers call "Croptober." This is driven by the natural shortening of days that triggers flowering in late summer, with most plants completing their flowering cycle as autumn arrives.
The primary threat in outdoor harvesting is weather. As autumn brings falling temperatures and rising humidity, conditions become ideal for Botrytis cinerea (grey mould / bud rot) to develop rapidly inside dense flower structures. Bud rot is visually identified as grey-brown discolouration inside the bud, with a cottony mould growth. Infected buds cannot be salvaged and must be removed and discarded immediately to prevent spread. Checking plants daily during the final weeks of outdoor flowering is not optional - an undetected mould outbreak can destroy an entire harvest in 48-72 hours under the wrong conditions.
Key outdoor harvest guidelines:
- Harvest on a dry day - ideally after at least two consecutive dry days to allow surface moisture to clear
- Cut in the morning after the dew has evaporated, before midday heat increases terpene evaporation
- Do not harvest immediately before or after heavy rain - buds retain moisture and mould risk is elevated for 24-48 hours after significant rainfall
- If a hard frost is forecast and plants are not yet ready, harvest early rather than risk ice crystal damage to trichomes and cellular tissue
- Autoflowers grown outdoors can provide two harvest windows in a single season - a late spring planting for a summer harvest, and a second planting for an early autumn harvest before photoperiod varieties are ready
For European growers working with outdoor cultivation, our outdoor cannabis growing guide covers regional timing, strain selection for European climates, and balcony growing with autoflower genetics.
The 48-Hour Darkness Pre-Harvest Technique
One of the most widely practised pre-harvest techniques among experienced growers is placing plants in complete, uninterrupted darkness for 48 to 72 hours immediately before cutting. This is done after flushing is complete, with no additional watering during the darkness period.
The theory behind the technique is that cannabis plants, when deprived of light, respond by increasing resin production as a protective response - trichomes are believed to act partly as UV filters, and light deprivation may trigger the plant to accelerate final resin accumulation. Many experienced growers also report that terpene content is higher and aroma more pronounced when harvesting after an extended dark period, compared to cutting mid-light-cycle.
What the Evidence Suggests
Controlled scientific studies specifically on the 48-hour pre-harvest darkness technique for cannabis are limited. However, the practice aligns with what is known about terpene accumulation - terpenes are highly volatile and are lost progressively under heat and light exposure. Harvesting before the day's light period begins (as recommended for indoor growers) is the least controversial version of this principle, and is broadly accepted. The 48-72 hour extended darkness period is more anecdotal in its evidence base, but is low-risk and widely used. At Cannapot, we consider it a worthwhile addition to your pre-harvest protocol, with the understanding that trichome readiness - not the darkness period - remains the primary harvest trigger.
How to Do It Correctly
1. Confirm trichomes are at or entering your target window
Begin the darkness period only when trichomes are already close to your harvest target. The darkness period is a final refinement, not a substitute for proper timing. Do not use it to "wait a few more days" on plants that are not yet ready.
2. Complete your final flush first
Finish flushing with plain pH-balanced water before beginning the darkness period. Do not water during the 48-72 hours of darkness - the slight drought stress may contribute additional trichome stimulation.
3. Ensure complete light seal
The darkness must be total. Even brief light exposure during the dark period stresses the plant in an unhelpful way and negates the intended effect. Check your tent or room for light leaks before beginning.
4. Harvest immediately when darkness ends
Cut the plant at the end of the 48-72 hour dark period, before any light exposure. Do not turn the lights on first. This preserves the maximum volatile terpene content accumulated during the dark period.
This technique is suitable for indoor photoperiod and autoflower plants. Outdoor growers can achieve a similar effect by covering plants completely with light-proof material for 48 hours before a morning harvest, though this is less practical to implement reliably.
How to Harvest Cannabis Step by Step
Tools You Will Need
- Sharp pruning shears or scissors - sterilised with isopropyl alcohol before use. Clean cuts minimise plant stress and contamination.
- Fine-tipped trimming scissors - spring-loaded versions significantly reduce hand fatigue during long trim sessions
- Nitrile gloves - protects trichomes from skin oils and keeps hands manageable during sticky trim sessions
- Drying rack or hanging lines - for whole-plant or branch hanging. Mesh racks for wet-trimmed individual buds.
- Hygrometer and thermometer - non-negotiable for monitoring your drying environment accurately
- Glass mason jars (wide-mouth) - for curing. Glass is the only acceptable material - plastic off-gasses and affects flavour.
- Humidity packs (62% Boveda or Integra Boost) - maintains ideal moisture level in jars throughout the cure
- Isopropyl alcohol and cotton pads - for cleaning scissors regularly during trimming as resin builds up
1. Final flush (1-2 weeks before harvest)
Feed only plain, pH-balanced water (pH 6.0-6.5 for soil; 5.8-6.0 for coco or hydro) for the final one to two weeks. The goal is to encourage the plant to metabolise stored mineral nutrients from its tissue before you cut - many growers report a smoother, cleaner final product. Stop all nutrient additions at minimum one week before harvest regardless of whether you flush formally.
2. 48-hour darkness period (optional but recommended)
Once flush is complete and trichomes are in or entering your target window, place the plant in complete darkness for 48-72 hours. No watering during this period. Harvest at the end of the darkness period before any light exposure.
3. Final trichome check across multiple sites
Before picking up your scissors, do one final trichome inspection on multiple bud sites across different parts of the plant. Upper colas and main buds ripen first; lower, shaded popcorn buds often lag by 5-10 days. If the upper buds are ready but the lowers are clearly not, consider a staggered harvest - cut the top portion and give the rest more time.
4. Cut the plant in early morning
Cut the entire plant at the base of the main stem, or work branch by branch. Whole-plant cutting is faster and produces a slower, more even dry. Branch-by-branch harvesting gives more control and is practical for very large outdoor plants. Either approach works - choose based on your drying space and plant size. Always work before the lights turn on or before midday sun outdoors.
5. Remove large fan leaves
Remove the large fan leaves by hand or with scissors. These contain very few trichomes and slow the drying process significantly if left on. The large structural leaves come off now. The sugar leaves - smaller, trichome-covered leaves embedded in or surrounding the bud - stay on until your chosen trimming stage.
6. Choose your trimming approach: wet or dry
Decide now whether you are wet trimming (trimming sugar leaves immediately while fresh) or dry trimming (hanging to dry first, trimming once fully dried). See the comparison below - the right choice depends on your humidity and available space.
7. Hang or rack for drying
Hang whole plants or branches upside down from a line or drying rack in your prepared drying space. For wet-trimmed individual buds, lay on a mesh drying rack with space between each bud. Buds must not touch each other - airflow between them is critical to even drying and mould prevention. Maintain 20°C / 60% RH in a dark room with gentle circulating airflow.
Wet Trim vs Dry Trim: Which Should You Choose?
Wet Trimming
Advantages
- Easier to trim - leaves are supple and cut cleanly
- Buds dry faster, reducing mould risk in humid environments
- Cleaner working space once drying begins
Disadvantages
- Faster drying increases risk of uneven moisture distribution
- Terpene loss accelerated by faster surface drying
- Extremely sticky - scissors clog quickly with resin
Dry Trimming
Advantages
- Slower, more even drying preserves terpene content
- Sugar leaves curl away naturally, making trimming cleaner
- Widely considered to produce superior final quality
Disadvantages
- Higher mould risk if humidity exceeds 65% during the longer dry
- Requires more drying space for whole plants or branches
- Dried leaves are tougher to cut, harder on scissors
The general recommendation: dry trimming produces better quality when your drying environment is properly controlled below 60% humidity. Choose wet trimming when your humidity is high and you need a faster dry to prevent mould, or when physical space forces you to process immediately.
Harvest Quick Reference
Trichome target (most growers): 80-90% milky, 10-20% amber on bud calyxes
Best time to cut (indoor): Early morning, before lights turn on
Best time to cut (outdoor): Morning, after dew evaporates, on a dry day
Pre-harvest darkness: 48-72 hours, no watering, completely light-sealed
Drying conditions: 20°C / 60% RH, dark, gentle airflow, 7-14 days
Ready to jar (snap test): Small stem snaps cleanly rather than bending
Drying and Curing: The Basics

Harvesting the plant is only the beginning. The quality of the smoke, vapour, or extract you ultimately produce is shaped enormously by what happens during the drying and curing phases. This is where most of the final flavour development occurs, where chlorophyll - which gives freshly cut cannabis that harsh, grassy taste - breaks down through enzymatic activity, and where remaining moisture redistributes evenly through each bud. Rushing either phase is one of the most common ways experienced growers ruin an otherwise excellent harvest.
Drying: The 20/60 Rule
The most reliable guideline for cannabis drying is the 20/60 rule: maintain approximately 20°C and 60% relative humidity in your drying space throughout the dry. This combination promotes a slow, even dry over 7-14 days - slow enough to preserve volatile terpenes and allow chlorophyll and residual nutrient breakdown, fast enough to prevent mould from taking hold.
Additional drying environment requirements:
- Complete darkness - UV light degrades THC and destroys terpenes. Your drying space must receive no natural or artificial light during the full dry period.
- Gentle, indirect airflow - a small oscillating fan circulating air in the room (not pointing directly at the buds) prevents mould pockets and ensures even drying. Never direct a fan at hanging buds.
- Consistent conditions - temperature and humidity swings during drying are more damaging than slightly imperfect but stable conditions. Stability matters more than perfection.
- Adequate spacing - buds and branches must not touch each other. Crowded drying racks develop hot spots and mould patches.
How to know when buds are ready for curing (the snap test): take a small branch and bend it. If it bends and feels rubbery or flexible, it needs more time. If it snaps cleanly and crisply, the moisture content is correct and it is ready for jars. The outside of buds should feel dry to the touch, but the interior should retain a slight springiness - not brittle or crumbly.
Curing: Where the Real Quality Develops
Curing is the process of placing dried buds in sealed, airtight glass jars and allowing remaining internal moisture to slowly and evenly redistribute over weeks. During this process, remaining chlorophyll continues to break down through anaerobic enzymatic activity, terpene profiles develop complexity and depth, and the overall smoke becomes dramatically smoother. The difference between uncured and properly cured cannabis from the same plant and harvest is not subtle - it is the difference between a harsh, grassy product and one that genuinely expresses the flavour and quality the genetics are capable of.
Basic curing protocol:
- Fill wide-mouth glass mason jars approximately three-quarters full - never pack them tightly. Buds need space to breathe.
- For the first two weeks, open jars for 10-15 minutes once or twice daily to release accumulated moisture and replenish oxygen - this process is called "burping." After week two, reduce to once every 2-3 days as moisture levels stabilise.
- Target 58-62% relative humidity inside the jar - small hygrometer lids or 62% Boveda / Integra Boost humidity packs help maintain this range without constant monitoring.
- Store jars in a cool, dark location. A cupboard, drawer, or basement away from heat sources and direct light is ideal. Avoid refrigerators - the temperature fluctuation during access causes condensation.
- Minimum useful cure time is 2-4 weeks. The best results come after 6-8 weeks. Some premium genetics with complex terpene profiles improve noticeably with 3-4 months of curing - particularly Haze and other long-flowering sativa varieties.
Warning: Ammonia Smell in Jars
If you open a jar and detect an ammonia or fermentation smell, the buds were not fully dry before jarring. Immediately spread them on a drying rack and allow them to dry further for 24-48 hours before re-jarring. Mould can establish and spread rapidly in an over-moist curing environment - an ammonia smell is an early warning that must not be ignored. Buds that develop visible mould during curing cannot be salvaged.
Cannapot Grow Tip: Long Cures Are Worth It
Many growers smoke their crop within 2-3 weeks of jarring because patience runs out. We understand - but the improvement between a 3-week cure and an 8-week cure on the same genetics is significant enough that setting aside a portion of your harvest for an extended cure is genuinely worth the wait. Label your jars with the harvest date and compare the same genetics at different cure lengths. The difference will make an extended cure a permanent part of your process.
The Most Common Harvesting Mistakes
1. Harvesting too early out of impatience
The most common mistake across all experience levels. Buds look impressive, the smell is intoxicating, and the temptation to cut is overwhelming. But the final two weeks of flowering are when the heaviest calyx swelling, trichome ripening, and resin accumulation happen. Cutting at week 7 when the plant needed 9 weeks means leaving 20-30% of potential potency and yield on the table. The trichomes tell you when the plant is done - not your excitement level. Every day you wait in the right window is a day of free quality improvement.
2. Treating the breeder's stated flowering time as a harvest date
Flowering time estimates from seed banks are produced under optimal commercial conditions - perfect nutrients, ideal CO2 levels, premium lighting. Your actual environment will produce a different result. Use the breeder's stated week as a signal for when to begin checking trichomes, not as a calendar date to harvest. Most home grows run 1-2 weeks longer than stated. Sativa-dominant and Haze genetics frequently run 3-4 weeks over their stated time.
3. Using only pistil colour as the harvest trigger
Pistils are useful as a supporting indicator, but they are not reliable enough to be the primary harvest signal. Sativa-dominant strains and Haze varieties commonly continue producing fresh white pistils when the trichomes are fully ripe and beginning to amber. Growers who rely solely on pistils with these genetics will habitually harvest late - past peak potency - every single cycle. Always confirm with a trichome check, especially with any genetics that runs longer than 9 weeks of flowering.
4. Reading trichomes on sugar leaves instead of bud calyxes
Sugar leaves mature and amber significantly faster than trichomes on the bud calyxes. A grower who checks the surrounding leaves and sees 60% amber may conclude the plant is done or even over-ripe - when the actual flower trichomes are still at 80% milky. Always position your loupe or microscope directly on the bud calyx tissue. If you can only see leaf trichomes, reposition until you can see the actual flower. This single adjustment prevents a lot of early harvests.
5. Rushing the drying process with heat or direct airflow
Using space heaters, dehumidifiers on high, or directing fans straight at hanging buds can dry cannabis in 3-5 days. The resulting product is harsh, hay-smelling, and terpenoid-deficient - because the rapid surface drying locks internal moisture while cooking off volatiles. The 20/60 rule and 7-14 day dry timeline are not suggestions. They are the baseline for quality drying. A rushed dry cannot be meaningfully fixed by curing - the terpene loss is permanent.
6. Skipping or shortening the cure
Many growers do the hard work of growing, drying, and trimming - then smoke the buds off the drying rack because they cannot hold off any longer. Freshly dried, uncured cannabis is harsh, grassy, and often causes headaches due to residual chlorophyll and volatile compounds. Even a 2-week cure transforms the experience. A 6-8 week cure is where genuine flavour complexity and smoothness develops. This is the stage that makes the difference between "good weed" and "exceptional weed" from identical genetics.
7. Harvesting the entire plant at once when upper and lower colas are at different stages
On large plants - particularly tall photoperiod varieties and substantial outdoor plants - upper colas receive significantly more light and typically ripen 5-14 days ahead of lower, shaded bud sites. Cutting the entire plant when the tops are ready means the lower buds are still underdeveloped. A staggered harvest - cutting top colas first, then giving lower buds another week in improved light exposure - maximises the quality and yield of the entire plant. Always check trichomes on each section independently before cutting.
Frequently Asked Questions
Can I harvest cannabis if my trichomes are still clear?
No. Clear trichomes indicate the plant is still actively synthesising and accumulating cannabinoids. THCA content is immature and well below its peak. Harvesting at this stage produces weak, anxious, racy effects with significantly lower potency and yield than the plant is capable of. Wait until the majority of trichomes have shifted to milky white before considering the harvest window open. Patience at this stage always pays off.
What happens if I harvest cannabis too late?
When all trichomes have turned amber, THC has largely degraded into CBN through oxidative processes. The psychoactive effect becomes heavily sedative and couch-locked rather than cerebral. Terpenes also diminish with over-ripeness, reducing aroma and flavour complexity noticeably. The buds often become darker and more fragile. The product is not ruined, but it no longer reflects the full potential of the genetics you grew. For most strains, anything past 30-40% amber is past the quality peak.
When should I harvest autoflowering cannabis compared to photoperiod plants?
Autoflowers reach harvest much faster - typically 8-12 weeks from seed, compared to 4-6 months for a photoperiod plant from germination through a vegetative period and full flowering cycle. The trichome signals are identical for both types, but you need to begin inspecting autoflowers from around week 7 since some fast-finishing varieties are genuinely ready at week 8-9. Unlike photoperiod plants, you cannot extend an auto's timeline by adjusting lighting - when the plant is done, it is done.
How long does cannabis take to dry properly?
Under ideal conditions (20°C / 60% RH with gentle indirect airflow in complete darkness), drying typically takes 7-14 days. Use the snap test to confirm readiness: bend a small stem - if it snaps cleanly and crisply, the bud is ready for curing. If it bends or feels rubbery, give it more time. Whole-plant hangs and thicker buds take longer than individually trimmed buds on mesh racks. Never use heat or strong fans to accelerate the process - the quality loss is significant and permanent.
Can I harvest the top colas first and leave the lower buds to mature?
Yes - this is called a staggered harvest and is a highly effective technique for large plants. Upper colas typically ripen 5-14 days ahead of lower, less-exposed bud sites. Cut the top portion when trichomes confirm readiness, then give the lower buds another week in the now improved light exposure. Always verify trichome readiness on each section individually before cutting. Never assume all sections of a large plant mature simultaneously.
Does the type of cannabis seed affect when and how I harvest?
Yes, significantly. Autoflowers have a fixed, genetically programmed timeline and do not respond to light schedule changes, making trichome inspection your only reliable harvest signal. Feminized photoperiods are triggered by a 12/12 light change and follow breeder timelines, though these vary in real-world conditions. Regular seeds require identification and removal of male plants during early flowering before they can pollinate females. CBD seeds should be harvested earlier in the trichome window than high-THC strains to protect the CBD cannabinoid profile. See the seed type table in this guide for full details on each.
Should I flush my cannabis plants before harvest?
Flushing - feeding only plain, pH-balanced water in the final 1-2 weeks before harvest - is a widely practised technique that many experienced growers swear by for a smoother, cleaner-tasting end product. The underlying theory is that running plain water through the medium encourages the plant to metabolise stored mineral nutrients from its tissue before cutting. The formal scientific evidence on flushing effectiveness is mixed, but the practice carries no meaningful downside. Whether or not you flush, stopping all nutrient additions at least one week before harvest is universally recommended by experienced growers.
Does the 48-hour darkness technique before harvest actually work?
The 48-72 hour pre-harvest darkness technique is widely used among experienced growers with broadly positive anecdotal reports of improved resin density and aroma. Rigorous controlled studies specifically on this technique are limited, but the practice aligns with established knowledge about terpene volatility under light and heat exposure. The technique carries no downside risk and is straightforward to implement. It is not a substitute for correct harvest timing based on trichome inspection - it is a final refinement applied once trichomes are already in your target window.
What magnification do I need to inspect cannabis trichomes?
A minimum of 30x magnification is needed to see trichome heads clearly enough to distinguish clear from milky from amber. A 30-60x jeweler's loupe is the most practical tool for on-plant inspection - affordable, portable, and battery-free. For greater detail and the ability to photograph and track progression over time, a 60-100x digital microscope designed for smartphones provides better resolution. A standard 20x loupe or basic magnifying glass does not provide sufficient detail for a reliable harvest call.
How long should I cure cannabis for the best results?
The minimum meaningful cure is 2-4 weeks, which produces a noticeably smoother product than uncured cannabis. The best results consistently come from 6-8 weeks of curing at 58-62% RH in sealed glass jars, with daily burping for the first two weeks, then every 2-3 days thereafter. Some genetics - particularly complex Haze varieties, long-flowering sativas, and high-terpene hybrids - continue to improve with 3-4 months of curing. A longer cure allows more complete chlorophyll breakdown and deeper terpene development, producing a richer, more layered flavour profile.
Ready to Grow Your Next Harvest?
The right genetics is where every successful grow begins. Cannapot has been sourcing and shipping premium cannabis seeds across Europe since 2004 - from fast-finishing autoflowers to classic feminized varieties, rare regulars, and high-CBD genetics.
Autoflower Seeds
Feminized Seeds
Outdoor Seeds
CBD Seeds
Related Guides
The Cannabis Growth Cycle: From Seed to Harvest
Cannabis Flowering Stage Week by Week
Growing Autoflowering Cannabis: Complete Guide
Growing Cannabis Outdoors in Europe