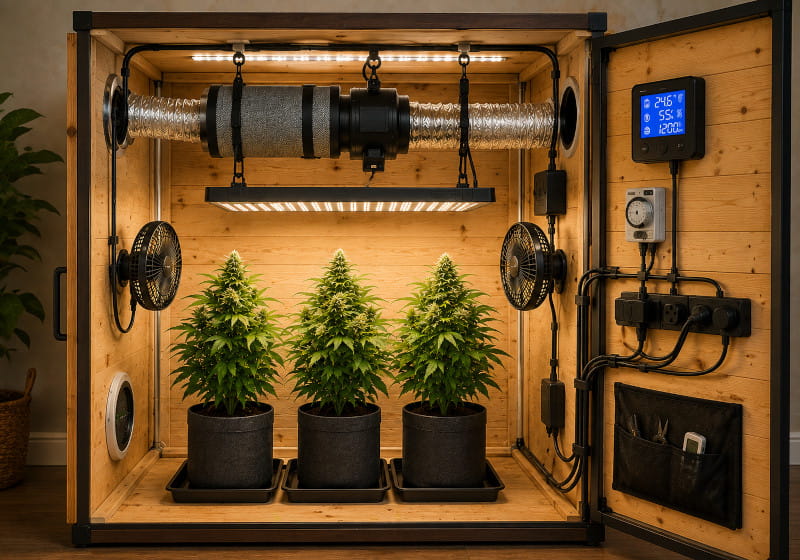
Build Your Own Grow Box: Guide, Materials & Ventilation
Build Your Own Grow Box: Planning, Materials & Ventilation
Updated: July 2026 | Build your own grow box: suitable location, dimensions, materials, interior lining, lighting, grow box ventilation, exhaust air, intake air, air circulation, VPD, electrical safety and mini grow boxes explained clearly.
Author: Cannapot Grow Team | Reading time: twenty-seven minutes
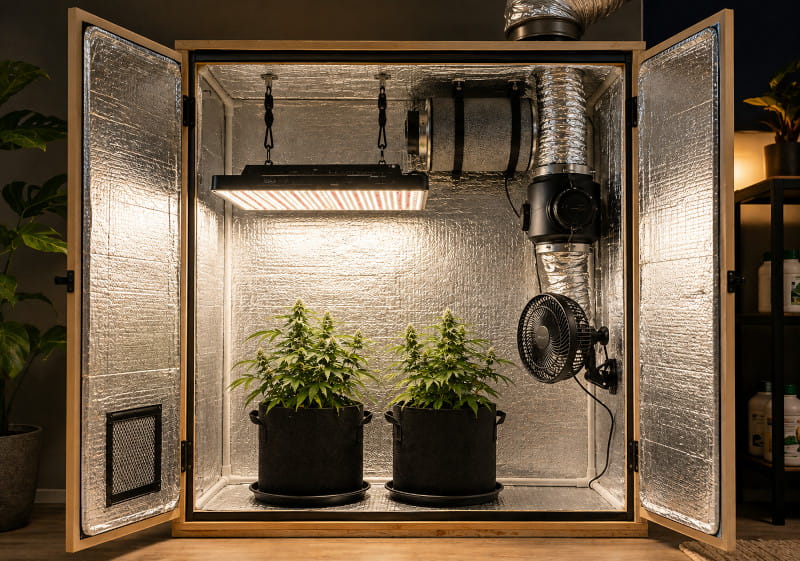
The Most Important Points at a Glance
✓ A DIY grow box must be lightproof, stable, moisture-resistant and easily accessible for maintenance work.
✓ Grow box ventilation consists of exhaust air, intake air and air circulation. These three functions serve different purposes and should be planned before construction begins.
✓ The exhaust fan must not only move the air volume inside the box, but also overcome the resistance created by the activated carbon filter, air ducts, bends and silencers.
✓ A mini grow box can be built to save space, but because of its small internal volume it reacts especially quickly to heat and humidity.
✓ Bright, matte interior surfaces distribute light more evenly. Mirrors, crumpled foil and highly flammable linings are unsuitable.
✓ Electrical components must be protected from irrigation water, condensation and high humidity. Improvised wiring has no place in a grow box.
Anyone who wants to build their own grow box can tailor its size, equipment and airflow to the available space. Unlike a ready-made grow tent, you are not limited to predetermined dimensions. This makes it possible to turn unused alcoves, sloped ceilings, cabinets or compact utility rooms into an enclosed cultivation area.
However, a DIY build is not simply four walls and a lamp. A functioning grow box is a complete technical system: lighting produces light and heat, plants and substrate release moisture, fans move air, and electrical devices operate in an environment where water is used regularly. Even small planning mistakes can therefore lead to heat buildup, high humidity, disruptive noise or safety problems.
Particularly important is grow box ventilation. It removes warm, humid air, supplies the interior with fresh intake air and, together with air circulation, prevents stagnant air from persisting between leaves and in corners. Ventilation should therefore not be added as an afterthought, but should influence the size, openings and construction of the box from the very beginning.
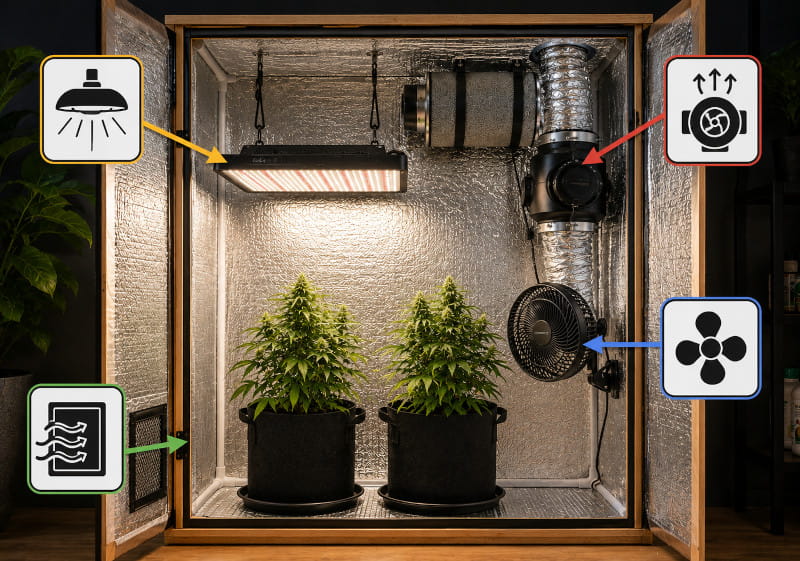
What is a grow box?
A grow box is an enclosed, largely lightproof indoor space in which lighting, air exchange, air movement and other environmental conditions can be controlled deliberately.
The term does not describe one specific construction type. A grow box can be a fabric grow tent, a converted cabinet or a completely custom-built chamber. What matters is that the interior reliably performs its functions and that the materials used are suitable for heat, moisture and regular cleaning.
Unlike outdoor cultivation or cultivation in a greenhouse the usable light inside a closed box comes entirely or predominantly from a grow light. The heat generated by the lamp initially remains inside the enclosure. At the same time, water vapor enters the air through evaporation from the substrate and through the plant leaves. Without controlled air exchange, temperature and relative humidity can therefore change within a short period of time.
What are the advantages of a DIY grow box?
The greatest advantage of a custom build is the ability to adapt dimensions, materials, access points and technical equipment precisely to the available location.
Ready-made grow tents are available in standardized sizes. This makes it easier to select compatible equipment, but it can be problematic when the available space has an unusual shape. With a DIY build, you can determine the width, depth and height freely, place doors where access is most convenient, and position intake and exhaust connections where airflow makes the most sense.
Load-bearing capacity can also be customized. Heavy activated carbon filters, exhaust fans and lights require secure mounting points. A sturdy frame construction may therefore be more suitable than a lightweight cabinet or a makeshift converted piece of furniture.
A DIY build is not automatically cheaper, however. Moisture-resistant panels, sturdy fittings, seals, reflective interior surfaces, ventilation connections and tools can significantly increase the total cost. Building your own grow box is most economical when suitable materials are already available or when special dimensions are required.
| Feature | DIY grow box | Ready-made grow tent |
|---|---|---|
| Dimensions | Freely adaptable to the available space | Determined by available standard sizes |
| Construction effort | Planning, tools and manual work required | Usually quick to set up |
| Load-bearing capacity | Can be planned individually with a suitable construction | Limited by the frame and manufacturer specifications |
| Lightproofing | Depends on joints, doors and workmanship | Largely built in on high-quality models |
| Cleaning | Depends on the chosen surface | Smooth inner lining is usually wipe-clean |
| Expandability | Openings and mounting points can be planned freely | Limited to existing connections |
What should be planned before construction?
Before construction, the location, internal dimensions, lighting, airflow, noise levels, power supply and accessibility must be planned together.
Do not begin cutting panels before the most important technical components have been selected. The size of the light affects the floor area. The required distance between the lamp and the canopy, together with pot height, plant height and suspension hardware, determines the necessary overall height. The activated carbon filter and exhaust fan also require space if they are to be mounted inside the box.
Also plan for sufficiently large access. A narrow door may save wall space, but it makes placing pots, cleaning and working on plants at the back more difficult. For wide boxes, two doors or a front section that opens completely may be useful.
Cables, irrigation lines and sensors also require suitable pass-throughs. Every opening should be positioned so that no unnecessary light escapes and no sharp edges can damage cables or air ducts. Openings can be drilled later, but this often results in inconvenient positions and additional sealing work. It is therefore worth planning the entire grow setup for indoor cultivation before construction and coordinating lighting, ventilation, irrigation and measuring equipment with one another.
Which location is suitable for a grow box?
A suitable location is dry, load-bearing, easily accessible, temperature-stable and allows the exhaust air to be routed sensibly.
The ambient temperature directly influences how easily the climate inside the box can be controlled. If the structure is placed in a hot attic, the incoming air may already be so warm that the exhaust fan can hardly provide sufficient cooling. In a very cold basement, on the other hand, low root temperatures, condensation on cold surfaces and strong fluctuations between periods with the lighting switched on and off can become a problem.
The floor must be able to support the weight of the structure, pots, water and technical equipment. Uneven surfaces make it harder to align the doors and can cause irrigation water to collect in one corner. A waterproof floor tray protects the box, but it does not replace a suitable supporting surface.
The exhaust route is especially important. If the exhaust air is discharged back into the same small room immediately next to the intake, an airflow short circuit occurs: the box draws in part of the already warm and humid air again. This significantly reduces ventilation efficiency. Ideally, exhaust air should be directed into a sufficiently large, well-ventilated area or – where structurally and legally permitted – outdoors.
In bedrooms and living areas, fan noise, airflow and waste heat from the equipment can be disruptive. Therefore, consider not only the measured sound pressure level of a fan, but also structure-borne noise transmitted through walls, furniture or ceilings.
How large should a DIY grow box be?
The right size depends on the available floor area, the planned lighting, the number of plants, the root space and the required distance between the canopy and the equipment.
A larger box provides more air volume and usually reacts more slowly to heat and humidity. However, it requires more powerful lighting and an appropriately sized exhaust system. A small construction saves space but is less forgiving of planning mistakes. Even small amounts of heat can quickly raise the temperature, while only a few plants can noticeably change the relative humidity.
When planning height, people often consider only the plants. In reality, pots, saucers, suspension hardware, the light, safety distance and, where applicable, the filter and fan also take up valuable space. A box with a large floor area but little height can therefore be more difficult to operate than a narrower, taller construction.
| Area | Required space | Why plan for it? |
|---|---|---|
| Pot and saucer | Depends on container height and drainage | Reduces the actually usable plant height |
| Plant area | Depends on genetics, training and vegetative period | Shoots should not remain in contact with the lamp or walls |
| Distance from the light | According to output, design and manufacturer specifications | Limits light and heat stress at the leaf surface |
| Suspension | Additional space above the light | Allows height adjustment and secure mounting |
| Ventilation equipment | Allow for filter, fan, ducting and bends | Equipment must not block the airflow path or lighting |
What types of grow box construction are possible?
A grow box can be built as a freestanding frame structure, a panel box, a converted cabinet or a compact tabletop or mini grow box.
A frame made from wooden battens or metal profiles forms a stable basic structure that is then clad with panels. This option allows custom dimensions and strong mounting points. However, all wooden surfaces should be treated or covered so that they do not absorb moisture and can be cleaned easily.
In a panel box, sufficiently strong side walls take on part of the load-bearing function. This can make the construction appear simpler, but it requires clean corner joints and a stable rear wall. Thin panels warp more easily and do not provide reliable support for heavy technical equipment.
Converting a cabinet saves work if a stable piece of furniture is already available. Before conversion, check whether the rear panel, shelves and fittings are sufficiently load-bearing. Many inexpensive cabinets have thin fiberboard panels, exposed edges and poorly sealed joints. They were not designed for heat, moisture or heavy ceiling loads.
To build a mini grow box yourself usually means converting a small cabinet, crate or compact enclosure. Because of the low internal volume, the lamp, power supply, exhaust system and plant height must be matched to one another particularly precisely.
Which materials are suitable for building a grow box?
Suitable materials are dimensionally stable, low-emission, moisture-resistant and flame-retardant, with smooth surfaces that are easy to clean.
Planed wooden battens or metal profiles are often used for frames. Wood is easy to work with and allows straightforward screw connections, but it must be protected from moisture. Metal profiles are dimensionally stable and do not absorb water, but they require suitable connectors and carefully deburred cut edges.
Suitable wall materials include coated furniture panels, moisture-resistant construction boards or appropriate plastic sheets. The type of panel is not the only important factor; edge and joint finishing also matters. Exposed chipboard edges can absorb water, swell and become difficult to clean over time.
Highly flammable foams, cardboard, untreated thin plywood and loosely attached films are unsuitable in the immediate vicinity of electrical equipment. Materials should also not release strongly odorous or unknown substances into the warm interior air.
| Material | Advantages | What should you watch for? |
|---|---|---|
| Wooden frame | Easy to work with, good mounting options | Protect from moisture and create smooth surfaces |
| Metal profiles | Dimensionally stable, moisture-resistant, slim construction | Deburr cut edges and use suitable connectors |
| Coated furniture board | Smooth surface, stable and easy to wipe clean | Seal edges and drilled holes carefully |
| Moisture-resistant construction board | Good moisture resistance when processed correctly | Coat or line the surface if necessary |
| Suitable plastic sheet | Waterproof and easy to clean | Check fire behavior, stability and heat resistance |
| Cardboard or packaging board | Inexpensive and readily available | Not suitable for permanent use: moisture-sensitive and a fire risk |
Which interior lining reflects light effectively?
A bright, matte and as uniform as possible interior surface distributes incoming light reliably and is easier to control than mirrored or heavily crumpled materials.
White, moisture-resistant surfaces are a straightforward solution for many DIY builds. They reflect light diffusely, helping to avoid strong point reflections. The surface should be wipe-clean and must not peel under heat or humidity.
Special reflective films can also be used, but they must be mounted smoothly, securely and without loose sections. Creases and waves alter light distribution. Loose film can also cover air openings, touch fans or make cleaning more difficult.
Household aluminum foil is not a good interior lining. It tears easily, forms creases and is difficult to keep permanently smooth. Mirrors are also unsuitable: they are heavy, breakable and reflect light directionally rather than distributing it evenly across the growing area.
How do you make a grow box lightproof?
Lightproofing is achieved through precisely fitted components, overlapped joints, sealed cable pass-throughs and a door with a continuous perimeter seal.
The most common light leaks are not found in the large wall surfaces, but around doors, hinges, corners and technical openings. Test the construction with the lamp switched on in a darkened room. Small gaps then become visible quickly and can be sealed specifically. Stray light should be avoided especially during the dark period, because repeated interruptions of the light-dark cycle can cause stress. In suitably sensitive cannabis plants, such stress may also encourage the development of intersex flowers. More about possible causes and typical signs can be found in our guide “Recognizing and preventing hermaphroditism in cannabis plants”.
A continuous door seal compensates for minor unevenness. For it to work, the door must press evenly against the frame at several points. Magnetic catches or sturdy latches can prevent wide doors from warping or lifting at the corners.
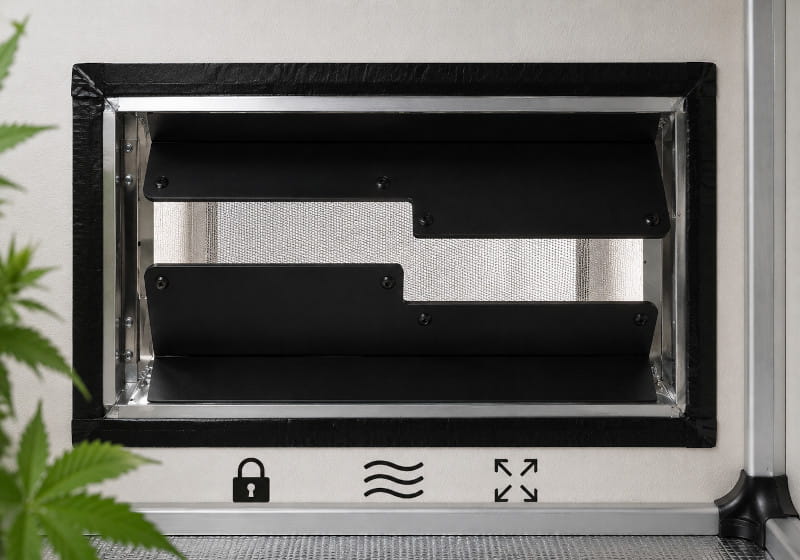
Intake openings must not simply be sealed completely. They need a light-blocking duct, a suitable light trap or an airflow path with several bends. The free cross-sectional area must remain large enough so that the intake air is not unnecessarily restricted.
Which tools and components are required?
Construction requires measuring and cutting tools, suitable fasteners, sealing materials and the previously selected components for lighting and ventilation.
Which tools are actually required depends on the construction. Wooden frames and furniture boards can usually be worked with a drill, screwdriver, saw, square, spirit level and suitable wood bits. Metal profiles require suitable metal drill bits, cutting tools and edge protection.
A hole saw or jigsaw makes it easier to create round openings for air ducts. The diameter must match the chosen ventilation system. Openings that are too small or irregular are difficult to connect airtight and can cause airflow noise.
| Area | Typical components | Note |
|---|---|---|
| Basic construction | Frame profiles, wall panels, brackets, screws | Allow for the load-bearing capacity required by the light and ventilation equipment |
| Door and sealing | Hinges, latches, sealing tape, overlapped joints | The door must open fully and close evenly |
| Interior surface | White coating or suitable reflective film | Make it moisture-resistant, smooth and wipe-clean |
| Floor | Waterproof tray or raised-edge floor liner | Extend it high enough and protect it mechanically |
| Ventilation | Exhaust fan, activated carbon filter, air duct, intake opening, circulation fan | Plan the system as one continuous airflow path |
| Electrical system | Light, controllers, timer, cables and suitable plug connections | Mount connections elevated, dry and strain-relieved |
| Monitoring | Thermometer, hygrometer and, if applicable, data logger | Position the sensor at canopy height |
How do you build a grow box step by step?
A grow box is most reliably built in the sequence of planning, frame construction, cladding, sealing, interior fitting, ventilation, lighting and a final functional test.
A systematic build prevents already installed components from having to be removed later. Openings for exhaust air, intake air and cables should in particular be made before the walls are permanently closed. The position of heavy components must also be determined early so that the frame and ceiling can be made sufficiently load-bearing at these points. When planning, also consider how you want to use the available plant space later. A Sea of Green (SOG) setup, for example, has different requirements for plant numbers and arrangement than the SCROG method, which also requires sufficient space for the screen, shoot guidance and access to the plants.
| Work step | Task | Checkpoint |
|---|---|---|
| 1. Determine dimensions | Determine internal and external dimensions based on plant area and equipment | Enough height is available for pot, plant, lamp and exhaust equipment |
| 2. Build the frame | Construct a stable base, side and top frame | The construction is square and resistant to twisting |
| 3. Prepare openings | Plan exhaust, intake, cables and, if applicable, irrigation | Diameter and position match the equipment |
| 4. Install walls | Attach outer surfaces and close joints | No exposed edges or unstable panels remain |
| 5. Finish interior surfaces | Create a bright, smooth and moisture-resistant surface | The surface can be cleaned completely |
| 6. Install the door | Fit hinges, closures and seals | The door closes evenly and lightproof |
| 7. Protect the floor | Install a waterproof tray or a raised-edge protective layer | Spilled water cannot penetrate into joints |
| 8. Install ventilation equipment | Install filter, exhaust fan, ducts, intake air and circulation fan | The airflow path is sealed, short and as streamlined as possible |
| 9. Install lighting | Securely mount the light and, if applicable, the driver | Height adjustment and the required safety distance are possible |
| 10. Perform a test run | Operate the box without plants for several hours | Temperature, humidity, noise and negative pressure remain controllable |
How is the grow box frame constructed?
The frame must be square, resistant to twisting and sufficiently load-bearing so that the light, filter and fan can be mounted safely.
Start with a level base frame. Measure both diagonals: if they are the same length, the frame is square. Then install the vertical corner posts and connect them to the upper frame. Additional cross braces stabilize wide walls and create mounting points for doors or technical components.
For a tall or wide box, the rear wall should not be viewed merely as cladding. A firmly screwed rear panel can brace the entire structure against lateral distortion. If thin panels are used, additional diagonal braces or sturdy corner connectors are advisable.
Plan at least two load-bearing cross supports in the upper area. One can hold the lighting, while the other supports the filter and exhaust fan. The load should not hang solely from a thin top panel. Mounting points must remain accessible so that equipment can later be checked or replaced.
How are the walls and ceiling installed?
Walls and ceiling are mounted flush with the frame, while cut edges, screw holes and joints are protected against moisture and light leakage.
Panels should be cut precisely and test-fitted before installation. Small deviations can still be compensated for on a single wall, but they add up across several surfaces and make later door installation more difficult. Fastening points should be distributed evenly so that the panels do not bow.
Exposed cut edges of wood-based panels require suitable sealing or covering. Moisture penetrates particularly easily at these points. Holes for screws, cables or ducts should also not remain untreated if the panel core can absorb water.
Depending on the material, joints can be closed with suitable sealing tapes, profiles or an appropriate permanently flexible sealant. The products used must be suitable for the respective substrate and must cure completely before the box is put into operation.
How do you build a tight and practical door?
A grow box door should open wide, be guided securely and press evenly against the frame via a continuous perimeter seal.
Wide doors provide good access but can warp if unsuitable materials are used. A dedicated door frame with cross braces improves dimensional stability. For very wide boxes, two narrower doors can be more practical because they require less space in front of the structure and are easier to close tightly.
Install several adequately sized hinges and align the door so that the gaps are even. Then fit the seal. It must not be compressed only at individual points; it needs contact all the way around. Several latches along the opening side of the door can distribute the closing pressure.
An overlapping strip on the inside or outside can interrupt the direct light path through the door gap. Such overlaps are especially effective on the hinge side and at the corners. The door should still be possible to open and close without excessive force.
How is the floor made waterproof?
The floor needs a continuous, raised and mechanically durable protective layer that catches spilled water and prevents it from penetrating joints.
A flat protective film without raised edges is only partly sufficient because water can run underneath it from the sides. A removable floor tray or waterproof liner extending several centimeters up the walls is better. Corners should be folded or permanently sealed.
The surface must withstand the weight of pots and saucers. Thin films can be damaged by sharp pot edges or shifted equipment. A smooth, rigid protective panel beneath the tray distributes loads and reduces the risk of punctures.
Even a waterproof tray should be kept dry regularly. Standing water increases humidity, encourages deposits and can conceal unnoticed leaks. Irrigation water should therefore be removed promptly.
Where should exhaust, intake and cable pass-throughs be located?
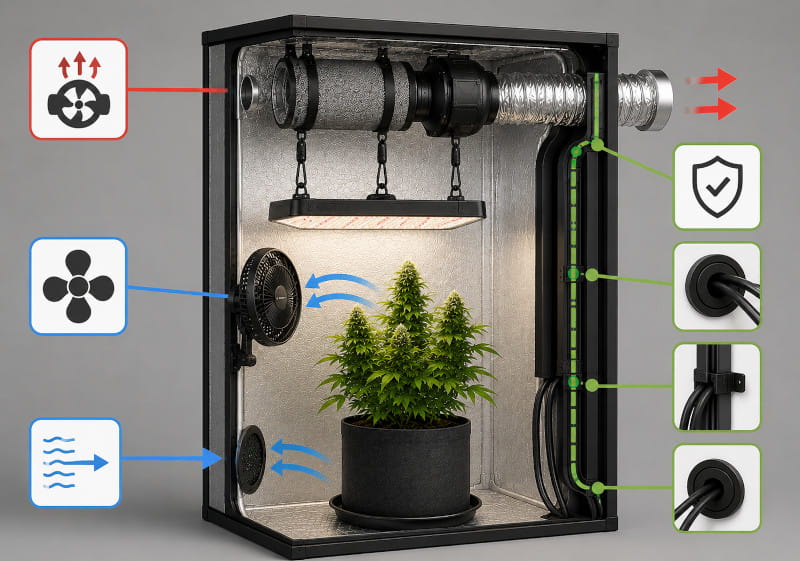
The exhaust opening is usually positioned high up, the intake as low as possible and offset from it, while cable pass-throughs should be dry and easily accessible.
Warm air tends to collect in the upper area. If it is extracted there, cooler intake air can enter near the floor and pass through the entire interior. If intake and exhaust are directly beside each other, however, the air takes the shortest route and large areas of the box receive poorer airflow.
The intake opening should not blow directly onto sensitive young plants. A duct, baffle or air deflector can distribute the incoming air. Light traps must not reduce the cross-sectional area so much that the exhaust fan has to work against unnecessarily high resistance.
Cable pass-throughs should not be placed in the lowest part of the box where spilled water could collect. They should have edge protection and be sealed in a way that does not pinch the cables. Power strips and power supplies should be mounted outside the humid cultivation area whenever possible.
How can you build a mini grow box yourself?
A mini grow box is built according to the same basic principles as a large box, but it requires especially compact equipment, low waste heat and a very carefully planned airflow path.
A small cabinet or a purpose-built enclosure can serve as the starting point. However, the available internal dimensions must be assessed realistically. After subtracting the pot, light, suspension, safety distance and ventilation equipment, considerably less plant space often remains than initially expected.
In a mini grow box, it often makes sense to mount power supplies, controllers or the exhaust fan outside the plant compartment. Every electrical device releases at least part of the energy it consumes as heat. Even small additional amounts of heat can cause a noticeable temperature increase in a small volume. Selecting suitable cannabis seeds, is equally important because growth habit, stretch and final height can vary considerably depending on genetics. With limited interior height in particular, you should consider how much a strain may still stretch after the switch to flowering and how much distance to the lighting will remain afterward. We explain the changes that occur during the individual weeks in detail in our guide to the cannabis flowering stage.
Which cannabis strains are suitable for a mini grow box?
Strains that naturally grow compactly and whose height development remains easy to control are especially suitable for a mini grow box.
Low-growing autoflowering strains and compact indica genetics are particularly interesting. Autoflowers also have the advantage that flowering does not have to be initiated by changing the light cycle. Lowryder is one of the well-known early autoflower genetics and is representative of compact, self-flowering lines. Corresponding Lowryder seeds can therefore be especially interesting when only limited height is available in a mini grow box. How compact a plant actually remains, however, depends not only on its genetics but also on the specific growing conditions.
| Strain | Growth habit | Suitability for a mini grow box |
|---|---|---|
| +Speed Auto | Very compact and short | Compact autoflower from Sweet Seeds for especially limited interior heights |
| New York City Auto | Compact to medium-sized, rather stocky structure | Well suited when manageable plant height is required |
| Bubba Kush | Compact to medium-sized, strong lateral branching | Bushy growth and comparatively easy-to-control height development |
| G13 x Hashplant | Stocky and bushy, short to medium internodes | Classic indica growth habit with comparatively manageable height |
| Airborne G13 | Compact, vigorous and rather bushy | Interesting for low boxes when plant height is taken into account early |
| Afghan Kush | Compact indica growth with a sturdy structure | Interesting for limited interior heights because of its typically stockier growth |
Which genetics are suitable does not depend exclusively on plant height, however. In addition to feminized and autoflowering strains, the available seeds also include regular seeds as well as CBD seeds specifically selected for certain cannabinoid profiles. Regardless of seed type, for a mini grow box you should focus above all on the expected growth habit, stretch and actual space requirements of the respective strain.
A strain description can only ever serve as a guideline. How large an individual plant actually becomes depends not only on genetics but also on factors such as pot size, vegetative period, lighting and plant training. Therefore, plan sufficient height reserve and, in addition to the plant itself, allow space for the pot, light, suspension and the required distance to the canopy.
The activated carbon filter also takes up a comparatively large amount of space. If mounted inside at the ceiling, it reduces usable height. External mounting can save space, but it must be compatible with the airflow and intended operating method of the filter. The manufacturer's specifications must be observed.
| Component | Requirement in a mini grow box | Typical planning mistake |
|---|---|---|
| Lighting | Slim, efficient and matched to the small area | Excessive output and too large a minimum distance |
| Exhaust air | Adjustable, compact and sufficiently powerful despite the filter | Selected only by volume, without considering heat and resistance |
| Intake air | Large free cross-section with a lightproof airflow path | Opening that is too small causes strong negative pressure |
| Air circulation | Gentle movement without a constant direct stream at one spot | A fan that is too large takes up space and moves the plants too strongly |
| Plant space | Compact growth habit and limited pot height | Stretch growth and lamp distance not taken into account |
| Electrical system | Preferably outside and protected from water | Power supplies and plug connections are placed on the floor |
Which dimensions are suitable for a mini grow box?
There is no universal minimum size for a mini grow box, but the width, depth and especially the height must match the light, the pot and the planned plant development.
Very low-profile constructions are particularly demanding. Even a compact light needs distance from the plant surface, while the pot and saucer already take up a considerable part of the height. Additional room is also needed for growth. An enclosure that appears tall enough from the outside can quickly prove too low inside.
The floor area should match the area that is actually illuminated. A significantly larger box will not automatically be lit evenly by a small lamp. Conversely, an overly powerful light on a very small area can produce excessive light intensity and unnecessary heat.
Also plan sufficient clearance at the sides for air movement and regular inspections. Leaves that remain pressed against the walls dry more slowly after becoming wet and are harder to inspect. At the same time, poorly ventilated areas can form more easily and encourage various cannabis plant problems. A small free margin between plants and side walls is therefore often more sensible than filling the available area completely with the maximum possible number of pots.
Can a cabinet be converted into a grow box?
A sturdy cabinet can be converted into a grow box if its load-bearing capacity, internal height, material, sealing and airflow are suitable.
First remove unnecessary shelves and check whether the side walls and rear panel remain stable. Some cabinets gain much of their rigidity from permanently installed shelves. If these are removed, the structure can distort and may need reinforcement with additional cross braces.
Thin rear panels are not suitable as the sole mounting surface for fans or filters. Heavy equipment should be attached to load-bearing sides, additional frame timbers or sturdy profiles. The cabinet top may also need reinforcement.
Coated furniture surfaces are usually easy to wipe clean, but exposed edges and drilled holes must be sealed. A separate tray should be installed especially in the floor area. Door gaps can be closed with sealing tape and light-blocking overlaps.
Before drilling air openings, check whether fittings, cables, load-bearing strips or wall connections are located behind the intended position. The airflow path should not be chosen solely according to where a hole is easiest to cut.
How does grow box ventilation work?
Grow box ventilation transports warm, humid interior air out, brings fresh air in and distributes it evenly through the plant area by means of air circulation.
The exhaust system creates the actual air exchange. A fan draws air out of the box and carries it through a duct into another area. At the same time, fresh air flows in through intake openings. When an activated carbon filter is used, the exhaust air passes through the filter bed before leaving so that odor-active molecules can be adsorbed by the activated carbon.
Air circulation serves a different purpose. It moves the air inside the box, mixes warmer and cooler zones and reduces stagnant, humid areas within the canopy. However, circulation does not replace air exchange: a closed space remains warm and humid despite several circulation fans if no air is exhausted and replaced with fresh intake air. At the same time, a fan should not blow a strong stream continuously onto the same part of a plant. Gentle, as even as possible or oscillating airflow is better. Excessively strong, permanent airflow can damage leaves and encourage so-called wind burn.
Effective ventilation depends on the entire system. Fan capacity, filter resistance, duct length, bends, diameter, intake cross-section and exhaust destination all influence one another. Individual components should therefore not be selected independently.
Why is ventilation so important in a grow box?
Ventilation limits heat and moisture, refreshes the air within the canopy and helps create a more even microclimate around leaves and the substrate surface.
Plants release water into the air through their stomata. Moisture also evaporates from the substrate and from exposed drainage water. In a closed box, this increases the absolute humidity. If the air later cools, relative humidity rises further and condensation can form on cool surfaces.
Lighting also changes the climate. Even efficient lamps ultimately convert a large share of the electrical energy they consume into heat. This heat must either be removed by the exhaust system or offset by cooler ambient air. The warmer the room outside the box, the lower the potential cooling effect of the incoming air.
Within a dense canopy, a more humid microclimate can form between overlapping leaves than is measured by a hygrometer in open air. Even circulation shortens such humid periods, but it should not blow strongly on the leaves continuously. Gentle movement of the leaf tips is usually enough to reduce stagnant boundary layers.
What is the difference between exhaust air, intake air and air circulation?
Exhaust air removes interior air, intake air replaces the removed air, and air circulation moves the existing air within the grow box.
| Function | Main task | Typical position | Does not replace |
|---|---|---|---|
| Exhaust air | Transport warm and humid air out of the box | In the upper area or outside at an upper connection | Air circulation within a dense canopy |
| Intake air | Allow fresh ambient air to flow in | As low as possible and away from the exhaust | Active cooling when room air is too warm |
| Air circulation | Mix air layers and reduce stagnant zones | At the side of or above the canopy | Exchanging humid interior air for outside air |
What does negative pressure mean in a grow box?
Negative pressure occurs when the exhaust system removes more air from the box than can freely flow back in through the intake openings.
With flexible grow tents, the walls pull slightly inward. In a rigid DIY grow box, negative pressure is less visible. Signs include doors that become harder to open, whistling gaps or noticeably reduced airflow at the exhaust outlet.
Slight negative pressure is desirable when the exhaust air passes through an activated carbon filter. It causes air to move inward through small leaks rather than escaping unfiltered. Excessive negative pressure, however, puts additional load on the fan, increases noise and reduces the actual airflow rate.
The solution is not automatically a stronger intake fan. Often it is enough to enlarge the passive intake area, simplify unnecessarily restrictive light traps or clean clogged dust filters. Only in large or very tightly sealed systems may powered intake air be useful.
How do you calculate the required exhaust capacity?
The required exhaust capacity depends on the internal volume of the grow box, the desired air exchange and the performance losses caused by filters, ducts and bends.
First calculate the internal volume. Multiply the internal width, internal depth and internal height in meters. A box measuring 1.0 meter wide, 1.0 meter deep and 2.0 meters high, for example, has an internal volume of 2 cubic meters.
The volume alone does not yet show how powerful the fan must be. An exhaust system works against resistance. Activated carbon filters, long air ducts, tight bends, reducers, silencers and dirty prefilters reduce the airflow that can actually be achieved. The maximum airflow stated for a fan is usually measured under more favorable test conditions than those present in the completed system.
For practical planning, a performance reserve should therefore be included. Instead of running a fan permanently at its maximum limit, a larger adjustable model is often more sensible. It can operate more quietly at a lower speed and provides reserve capacity for hot days, increasing filter resistance or later system expansion.
| Influencing factor | Effect on airflow | Sensible planning |
|---|---|---|
| Activated carbon filter | Creates continuous airflow resistance | Match filter and fan to one another |
| Long air duct | Increases friction and reduces airflow volume | Route the duct as short and straight as possible |
| Tight bends | Cause turbulence and additional pressure loss | Use wide radii instead of sharp kinks |
| Reducers | Narrow the airflow path and can increase noise | Use a consistent duct diameter whenever possible |
| Dust-loaded prefilter | Progressively reduces airflow | Inspect regularly and clean according to the manufacturer’s instructions |
| Warm intake air | Limits the possible cooling | Do not treat exhaust capacity as a substitute for cool ambient air |
How can the airflow requirement of a grow box be estimated realistically?
A realistic estimate considers not only a calculated air-change rate, but above all the actual temperature and humidity development during test operation.
Fixed rules such as one complete air change per minute can serve as a rough guide, but they are not a universal sizing rule. A small box with low lighting power may remain stable with a small fan, while high lighting power in a warm room can require substantially stronger exhaust airflow.
The temperature difference between intake air and the interior is decisive. If the room temperature is already 28 degrees Celsius, a stronger fan cannot reliably cool the box to 24 degrees Celsius as long as no cooler air source or active air conditioning is available. Exhaust ventilation can remove heat only when the incoming air is cooler.
Humidity must also be checked under real conditions. An empty box produces hardly any water vapor. A test run without plants therefore shows heat development reliably, but not the later moisture load. After commissioning, the readings must be checked again and the fan settings adjusted.
Which exhaust fan is suitable for a grow box?
A suitable choice is an adjustable inline fan that still moves enough air with an activated carbon filter connected and the real duct layout in place.
Fans differ not only in their maximum airflow. Static-pressure capability, noise level, controllability, power consumption, physical size and suitability for continuous operation are also important. A model with high free-air airflow but poor pressure stability can lose more performance across a restrictive filter than an inline fan designed for such loads.
Electronic or temperature-dependent speed control can simplify operation. The fan then runs at reduced speed during normal operation and increases its output when a set temperature is exceeded. At very low speed, however, check that sufficient negative pressure and airflow through the filter are still maintained.
Not every fan works reliably with every controller. Unsuitable dimmers can cause humming, overheating or motor damage. Therefore, use only controls explicitly compatible with the motor type or integrated into the fan itself.
How large should the intake-air cross-section be?
The free intake-air cross-section should be larger than the exhaust cross-section so that air can flow in without strong whistling or excessive negative pressure.
A single small opening limits the entire airflow even when a powerful exhaust fan is installed. The fan then tries to draw air through an opening that is too narrow. This increases air velocity, generates noise and reduces the amount of air actually moved.
With passive intake air, several larger openings are often preferable to one narrow inlet. They can be placed in different locations as long as they are lightproof and do not create uncontrolled airflow short circuits. Dust or insect screens reduce the free cross-section and must therefore be taken into account when sizing the openings.
Active intake with its own fan can be useful for large systems or long intake-air paths. It should move slightly less air than the exhaust system so that slight negative pressure is maintained. Two independently operating fans without coordinated control can instead cause alternating positive and negative pressure.
How do you build a lightproof intake opening?
A lightproof intake opening interrupts the direct light path with offset baffles or an angled duct without unnecessarily reducing the airflow cross-section.
A simple opening covered with dark fabric can reduce light, but it can clog easily with dust and may be sucked inward under strong negative pressure. A more stable solution is a light trap made from rigid baffles. Air flows around several offset surfaces while light has no straight path to the outside.
The inner surfaces of the light trap should be dark and matte. Bright or glossy surfaces can transmit light through multiple reflections. At the same time, the channel must remain sufficiently large. Every change in direction increases airflow resistance, which means narrow labyrinths can be unsuitable despite providing good light blocking.
A removable cover makes cleaning easier. Dust, pet hair and plant debris collect especially around intake openings and filters. As the cross-section becomes increasingly blocked, negative pressure rises and exhaust performance falls.
How does an activated carbon filter work in a grow box?
An activated carbon filter binds many odor-active molecules to the large internal surface of its activated carbon layer as air is drawn through the filter.
Activated carbon has a highly porous structure. This provides a very large surface area in a small volume on which certain gaseous substances can be adsorbed. To ensure the air has enough contact time with the carbon, it must not be moved through the filter at an arbitrarily high speed.
The filter and fan therefore need to be matched. If the fan is significantly stronger than the airflow rate intended for the filter, the air residence time may be too short. If the filter is too small or heavily clogged, resistance increases and exhaust performance decreases.
Most systems are arranged so that the fan pulls air through the filter. This keeps the section between filter and fan under negative pressure. Small leaks then tend to draw air into the system rather than allowing unfiltered air to escape.
Where should the activated carbon filter be mounted?
The activated carbon filter is usually mounted in the upper part of the grow box because warm air collects there and can be extracted directly.
A typical sequence is: filter, short connecting duct, exhaust fan and then the exhaust duct leading out of the box. The shorter the connection between filter and fan, the lower the unnecessary pressure losses.
The filter must not rest loosely on the light or on an unstable shelf. Activated carbon filters can be considerably heavy. They require at least two suitable mounting points and an additional safety attachment. Straps or brackets must not be routed over sharp edges.
In low-height boxes, the filter can be mounted outside to save interior height. However, this arrangement must be technically compatible with the filter. Not every filter is designed for every airflow direction. Connections on the pressure side should also be sealed especially carefully because unfiltered air could escape through leaks there.
How long does an activated carbon filter last?
The service life of an activated carbon filter depends on the amount of carbon, airflow, humidity, dust load and concentration of the substances being adsorbed.
A fixed service life is therefore only a rough manufacturer guideline. If a filter is operated continuously near its maximum rated airflow, it may lose effectiveness more quickly. Very high humidity can also impair adsorption because water occupies part of the available surface area.
The prefilter keeps dust and larger particles away from the activated carbon. It should be checked regularly and cleaned or replaced according to the manufacturer’s instructions. A dirty prefilter reduces airflow and can place unnecessary load on the fan.
A declining filter may become noticeable through odor outside the box. Before replacing it, however, leaks, loose duct clamps, damaged ducts and insufficient negative pressure should also be checked. Odor leakage does not automatically mean that the activated carbon is completely exhausted.
Which air duct is suitable for exhaust ventilation?
A suitable exhaust duct has the correct diameter, can be connected airtight and is routed as short, straight and free from crushing as possible.
Flexible ducts make installation easier, but their ribbed inner surface creates more resistance than smooth pipe. If a flexible duct is heavily compressed, additional folds form. Therefore, extend it only as far as necessary and avoid unnecessarily long reserve loops.
Acoustically insulated ducts can reduce airflow and fan noise. However, they have a larger outer diameter and require more space. All layers must also be secured carefully at the connection so that no air enters between the inner and outer jackets.
Every change in direction should have as large a radius as possible. A kinked duct can severely reduce the cross-section. This causes not only performance loss, but often clearly audible airflow noise as well.
| Design | Characteristics | Suitable use |
|---|---|---|
| Simple flexible duct | Lightweight, inexpensive and easy to route | Short air paths with few bends |
| Acoustically insulated duct | Larger outer diameter, reduces certain airflow noises | Living spaces and noise-sensitive locations |
| Smooth pipe | Lower airflow resistance, dimensionally stable | Permanent installations with well-planned routing |
| Reduced-diameter pipe system | Saves space but increases air velocity and resistance | Only when structurally unavoidable and adequately calculated |
Where should the exhaust air be routed?
Exhaust air should be directed to an area where heat and moisture can be removed reliably and will not immediately return to the grow box.
If the exhaust air is blown into the same small room from which the box draws its intake air, the room temperature gradually rises. Humidity increases at the same time. As a result, the box draws in increasingly unfavorable air and has to operate at higher fan power.
A larger living or utility room can absorb the discharged heat temporarily, but it also needs sufficient ventilation itself. Opening windows or using an existing suitable exhaust system may help. Structural connections to chimneys, ventilation shafts or exterior walls may only be used if they are technically, legally and in terms of fire safety intended for that purpose.
When venting outdoors, rain, cold air, animals and foreign objects must be prevented from entering the system. A backdraft damper can reduce unwanted reverse flow, but it also increases resistance. Exterior outlets must not adversely affect shared areas or neighboring windows.
How should air circulation be planned correctly?
Air circulation should move the entire canopy gently without directing a strong air stream continuously at individual leaves or shoots.
A single fan often does not reach every area in a tall or densely planted box. The air above the canopy may move well while humid zones remain below the leaves. In larger constructions, several smaller fans are therefore often more effective than one powerful unit.
Fans can be aimed slightly across the canopy from the side or positioned so that a circular airflow develops. Continuous direct airflow from close range can dry leaf edges and cause mechanical stress. Leaves should move gently, but should not flap strongly all the time.
Gentle air movement below the canopy can also be useful. It helps the substrate surface dry and reduces stagnant air between pots. However, fans must not draw in water and should not be mounted so low that they become wet during watering.
Should a circulation fan oscillate?
An oscillating fan can distribute airflow, but it is not necessarily better than several fixed fans operating at low power.
Oscillating units regularly change the direction of airflow and therefore avoid directing a permanent air stream at the same spot. However, the oscillation mechanism is an additional moving component that can wear during continuous operation. With inexpensive clip-on fans in particular, secure mounting and sufficient clearance from walls should be ensured.
Two fixed fans mounted offset from each other can create more even airflow and have no oscillation mechanism. However, their direction needs to be adjusted carefully as the canopy grows or becomes denser.
Regardless of design, cables must not come into contact with moving parts. Protective grilles must be fully installed, and the devices should be suitable for the intended continuous operation.
How can you make a grow box quieter?
Noise can be reduced by generously sizing fan capacity, decoupling structure-borne vibration and designing the airflow path with a large diameter and low resistance.
Many noise problems arise because a small fan runs permanently at maximum speed. A larger adjustable fan can produce the same airflow at a lower speed and therefore operate more quietly. The control range must still be compatible with the required minimum airflow.
Structure-borne noise occurs when vibrations are transferred to walls, ceilings or furniture. Elastic suspensions, suitable rubber elements and flexible connectors can reduce this transmission. The fan should not be screwed directly to a thin panel that acts like a resonating surface.
Airflow noise occurs especially at narrow cross-sections, sharp bends, grilles and small openings. A larger duct diameter reduces air velocity at the same airflow volume. Sufficiently large intake openings also prevent whistling and strong suction noise.
| Noise source | Typical cause | Possible improvement |
|---|---|---|
| Humming | Unsuitable speed control or motor vibration | Use a compatible controller and decouple the fan |
| Droning | Vibrations are transferred to panels or furniture | Suspend elastically and reinforce resonant surfaces |
| Whistling | Intake opening too small or gap too narrow | Increase the free intake cross-section |
| Air rush | High air velocity in the duct | Use a larger diameter and lower fan speed |
| Rattling | Loose parts, duct clamps or backdraft dampers | Check fasteners and secure moving parts |
How can an exhaust fan be vibration-isolated?
An exhaust fan is vibration-isolated by preventing its vibrations from being transferred directly to rigid structural components.
Suitable rubber mounts, elastic straps or purpose-designed vibration dampers can separate the fan from the frame. The suspension must carry the weight permanently and must not fail due to heat, moisture or aging.
Short flexible duct sections between the fan and rigid pipework also reduce vibration transmission. They must not be crushed or sharply bent. Rigid connections can carry vibrations over long distances into walls or ceilings.
A fan must not be completely wrapped in unsuitable insulation material. Motors and electronics generate heat and require the cooling specified by the manufacturer. DIY soundproof boxes must be fire-resistant, ventilated and accessible for maintenance.
How is the ventilation of a mini grow box sized?
In a mini grow box, ventilation must be designed for low waste heat, short airflow paths and a sufficiently large intake cross-section.
The small internal volume should not tempt you to plan only a weak fan. In a compact box, the light is closer to the plants and walls. As a result, the air can heat up quickly even with low total power.
A small fan with a very narrow connection often has to run at high speed and can therefore sound more noticeable than a larger, throttled model. Available installation space, however, limits filter and duct diameter. The airflow path in a mini grow box should therefore be especially short and free of unnecessary bends.
Passive intake openings still require sufficient area even in a small box. Small light traps, dense filter mats and decorative ventilation grilles can greatly reduce the free cross-section. Slight negative pressure is useful; noticeably pulled-in seals, whistling openings or strongly reduced exhaust airflow indicate that the intake is too restrictive.
How do you measure temperature and humidity correctly?
Temperature and humidity are measured most meaningfully at canopy height and protected from direct lamp radiation or airflow.
A sensor directly beneath the light can show higher readings because of radiant heat than the surrounding air actually has. A sensor placed immediately in front of the intake mainly measures incoming room air. For a representative reading, the device should hang freely in the plant area without touching leaves or damp surfaces.
Minimum-maximum memory or data loggers are more useful than single snapshots. They show whether temperature rises sharply after the lights switch on or whether humidity remains high for a prolonged period after the lights switch off.
In larger boxes, several measuring points can be useful. One sensor above the canopy and a second in the lower area show whether pronounced air layers are forming. Large differences indicate insufficient circulation or unfavorable airflow routing.
Why are the dew point and condensation important?
The dew point is the temperature at which humid air becomes saturated and water vapor condenses on cooler surfaces.
Warm air can contain more water vapor than cold air. When the grow box cools after the lighting is switched off, relative humidity therefore rises even if no additional water has evaporated. If walls, air ducts or other surfaces become colder than the dew point, condensation forms.
Boxes positioned against cold exterior walls, in unheated basements or on poorly insulated floors are particularly at risk. Condensation can form behind linings and remain unnoticed for a long time. Sufficient air circulation should therefore be possible between the box and cold building surfaces.
Consistent exhaust airflow during the dark period can remove moisture. If the exhaust system is switched off completely while plants and substrate continue to release water, relative humidity can rise quickly. The appropriate minimum fan output depends on the room climate and moisture production.
Which lighting is suitable for a DIY grow box?
An efficient, dimmable grow light whose output and dimensions match the floor area and available height is suitable for a DIY grow box.
Modern LED lights are practical for many DIY builds because, for the same amount of usable light, they usually generate less waste heat than older high-pressure discharge lamps. They are not completely heat-free, however. A substantial portion of the electrical energy consumed is ultimately released as heat into the interior and must be removed through the grow box ventilation.
The light should cover the entire growing area as evenly as possible. A small, very intense light source can oversupply the center while edge areas receive significantly less light. Slim lights with several evenly distributed LED bars or modules are often more suitable for rectangular areas than compact point-source systems.
Electrical power in watts is not the only factor that matters. Optical efficiency, beam angle, design, distance from the plant and light distribution all influence how much usable light actually reaches the leaf surface. Manufacturer recommendations for coverage area should therefore be considered together with independent measurements and the intended dimming level.
| Property | Why is it important? | What should you watch for? |
|---|---|---|
| Dimensions | Determine light distribution across the floor area | The light must not block walls or the airflow path |
| Dimming function | Allows adjustment to the plant stage and distance | Check the control range and power consumption at partial load |
| Driver or power supply | Generates additional heat | Mount outside the box if possible |
| Protection rating | Electrical equipment is located in a humid environment | Ensure suitability for the intended use |
| Suspension | Allows safe height adjustment | Plan for load-bearing capacity and an additional safety attachment |
How much light does a grow box need?
Light requirements depend on the growing area, development stage, plant distance, spectrum and actual light distribution and cannot be determined reliably from wattage alone.
Photosynthetic photon flux density is often used to assess plant lighting. It describes how many photons in the wavelength range relevant to photosynthesis reach a given area over time. A single measuring point is not enough, however. Distribution across the entire usable area is what matters.
Young plants generally need lower light intensity than vigorous, well-developed plants. A dimmable light therefore offers the advantage of gradually adjusting output to the respective development stage without constantly changing the distance to the plant. Permanently excessive light intensity can place additional stress on plants, especially when combined with high temperatures, insufficient water supply or nutrient problems. Because different stress responses can look similar, unusual leaf changes should not automatically be attributed to lighting alone. Typical signs of a nutrient deficiency in cannabis should also be considered when analyzing the cause.
Too little light often shows up as long, unstable stretching and large distances between leaf nodes. However, these characteristics can also be influenced by genetics, temperature and unfavorable air movement. Lighting should therefore never be assessed in isolation.
How high should the light hang in the grow box?
The correct lamp distance depends on the type of light, dimming level, light distribution, plant stage and the manufacturer’s specifications.
Too little distance increases light intensity in the center and can additionally warm the leaf surface. Too much distance reduces the amount of usable light and often worsens uniformity at the edges. Manufacturer recommendations are a sensible starting point but must be adapted to the actual conditions inside the box.
Do not observe only the uppermost leaves directly beneath the lamp. Also check edge areas and lower plant parts. If leaf edges curl upward, upper leaves become unusually pale or dry spots appear directly in the light center, light intensity, heat or water balance may not be properly matched.
The suspension system must allow quick and safe height adjustment. Loose knots, thin cords or improvised hooks are unsuitable. Use load-bearing suspension hardware with an additional safeguard against falling.
How do you prevent heat buildup beneath the light?
Heat buildup beneath the light is limited by sufficient distance, even air circulation and effective exhaust ventilation in the upper part of the box.
Warm air can collect between the light and the ceiling. If the exhaust opening is positioned unfavorably below the lamp, some of this warm layer remains. The extraction point should therefore be located so that heated air is reliably captured from the upper area.
A circulation fan can break up the warm air layer beneath the light, but it should not blow directly on sensitive components or continuously on the same leaves. The goal is slow mixing, not a strong localized air stream.
Externally mounted power supplies reduce heat inside the box. Cables, dimmers and control units should also not be placed directly above the light or in poorly ventilated cavities. Their permissible ambient temperatures must be observed.
What temperature is suitable in a grow box?
A grow box should be operated within a moderate, as stable as possible temperature range, while light intensity, humidity, water availability and plant stage are considered together.
Universal ideal values have only limited applicability. Different genetics respond differently, and leaf-surface temperature can also differ from the measured air temperature. Under a strong lamp, a leaf can be warmer than the surrounding air, while vigorous transpiration can cool the surface.
Persistently high temperatures increase water use and can limit photosynthesis. Very low temperatures slow metabolism and root activity. Large differences between the light and dark periods are especially problematic when the box cools rapidly after the lighting is switched off.
For practical operation, the trend and extreme values are more important than a single reading. A data logger shows how quickly the box warms up, when the peak value is reached and how strongly it cools after the lights switch off. This information helps when adjusting exhaust ventilation and the room climate.
How high should the humidity be in a grow box?
Humidity should match the development stage and, above all, should not remain so high for extended periods that leaves, the canopy or surfaces stay persistently damp.
Young plants have a smaller root mass and respond differently to dry air than large, well-rooted plants. As leaf area increases, however, moisture production inside the box also rises. Dense canopies can therefore develop significantly higher values than small plants even with identical fan settings.
The highest relative humidity often occurs after the lamp switches off. The air cools while plants and substrate continue releasing water vapor. If the exhaust system is also greatly reduced or switched off, humidity can rise rapidly.
A single hygrometer reading does not describe the entire microclimate. Significantly higher local values can occur between densely packed leaves, at cold walls or directly above moist substrate. Good plant spacing and air circulation therefore remain important even when the measured values appear suitable.
| Observation | Possible cause | Useful check |
|---|---|---|
| Humidity rises sharply after lights-off | Cooling combined with insufficient night ventilation | Increase minimum exhaust output and check room air |
| Condensation on walls | Surface is below the dew point | Check temperature trend, insulation and air movement |
| Very dry air with high exhaust flow | Dry room air and high air-change rate | Check intake-air climate and unnecessarily high fan output |
| Humid zones in dense foliage | Insufficient circulation and plants positioned too closely | Improve airflow through the canopy and plant spacing |
How can humidity be reduced?
Humidity can be reduced by exhausting moist air, keeping room air drier and avoiding unnecessary water sources inside the box.
The first step is sufficient exhaust ventilation. However, it can only have a drying effect if the incoming room air contains less water vapor than the air inside the box. If the entire room is very humid, grow box ventilation alone reaches its limits.
Avoidable moisture sources can also increase humidity inside the grow box. Examples include standing drainage water, permanently filled saucers, open water containers or substrate that remains heavily waterlogged for long periods. Remove excess water promptly and adjust watering volume to the plants’ actual needs. The goal is not to let the substrate dry out unnecessarily, but to reduce waterlogging and avoidable evaporation.
A dehumidifier works most efficiently in the room where the box is located because it also dries the air entering the box. Small passive desiccant dehumidifiers generally cannot compensate effectively for the moisture load from large plants. Electric dehumidifiers generate additional heat and must be included in the overall climate plan.
How can excessively dry air be corrected?
Air that is too dry is most sensibly corrected through the climate of the surrounding room and an appropriately adjusted exhaust rate.
If the exhaust system runs much more strongly than necessary, dry room air is constantly pulled through the box. Temperature- or humidity-dependent control can help limit air exchange to the required level. A sufficient minimum airflow must nevertheless be maintained.
Humidifiers can be used, but they require hygienic maintenance. Standing water, dirty reservoirs and uncleaned nozzles can spread microorganisms. Mineral-rich tap water can leave fine white dust on leaves and equipment with certain types of devices.
The device should not be aimed directly at plants, lights or sensors. A localized mist zone distorts readings and can wet surfaces unnecessarily. It is often better to moderately humidify the room air outside the box.
What role does VPD play in a grow box?
Vapor pressure deficit describes, in simplified terms, how strongly the air can absorb water vapor from the leaf surface.
The commonly used term VPD stands for Vapor Pressure Deficit. It combines temperature and humidity into a value that describes the potential evaporative demand better than relative humidity alone. For an accurate calculation, leaf temperature rather than air temperature alone is actually relevant.
A high vapor pressure deficit can greatly increase transpiration. Plants then require sufficient water supply, while very low values can limit transpiration and encourage moist surfaces. VPD is not an isolated control target, however. Light, root health, air movement and substrate moisture remain equally important.
Online charts often work with generalized assumptions about leaf and air temperature. They are useful for orientation but do not replace observing the plant. Faulty sensors or direct lamp radiation can produce calculations that appear precise but are actually inaccurate.
VPD Calculator
Calculate Vapor Pressure Deficit using air temperature, relative humidity and leaf temperature.
How safely must the electrical system in a grow box be installed?
The electrical system in a grow box must be designed for continuous operation, protected from moisture, mounted securely and adequately protected against overload.
In a grow box, electrical devices are used around irrigation water, high humidity and sometimes elevated temperatures. Plug connections, timers and power supplies must therefore not lie on the floor. They should be mounted in an elevated position and, whenever possible, outside the plant compartment.
Power strips must not be daisy-chained. The total power consumption of all connected devices must remain below the permissible load of the outlet, extension lead, switching device and circuit. This includes not only the rated power of the lamp, but also fans, heaters, dehumidifiers, humidifiers and other equipment.
Damaged cables, loose terminals, exposed terminal blocks and connections improvised with electrical tape are unacceptable. Work on fixed electrical installations belongs in qualified hands. Suitable residual-current protection can reduce risk, but it does not replace proper installation.
Cables should be routed with a drip loop. This prevents water from running directly along the cable into a plug connection. All cables require strain relief and sufficient clearance from sharp edges, moving fans and hot components.
How do you calculate the electricity consumption of a grow box?
Electricity consumption is determined by the electrical power of each device and its actual operating time.
For the calculation, power in kilowatts is multiplied by operating hours. A 300-watt light equals 0.3 kilowatts. If it runs for twelve hours, it theoretically consumes 3.6 kilowatt-hours per day. Exhaust fans, circulation fans, controllers and, if applicable, climate-control devices must also be included.
Adjustable devices consume less power at partial load than at full output, although not always in exact proportion to the selected setting. A plug-in energy meter provides more realistic values than simply adding up the ratings on the nameplates.
Climate-control devices can greatly increase consumption. If a room must be actively cooled because of excessive waste heat or continuously dehumidified because of high humidity, the additional energy requirement can add substantially to the lighting load. Efficient planning of the location, exhaust ventilation and lighting reduces this requirement.
Grow Box Electricity Cost Calculator
Enter the actual power consumption of your devices and their daily operating time. The calculator uses these values to determine electricity consumption and estimated electricity costs.
| Device | Power (W) | Hours/day |
|---|---|---|
| Grow light | ||
| Exhaust fan | ||
| Circulation fans | ||
| Dehumidifier | ||
| Heating / Cooling |
| Device | Calculation | What to consider |
|---|---|---|
| Grow light | Kilowatts × daily lighting hours | Measure actual power consumption when dimmed |
| Exhaust fan | Kilowatts × daily operating time | Often runs around the clock at varying speed |
| Circulation fans | Total of all devices × operating time | Include several small devices together |
| Dehumidifier | Measured power consumption × actual operating time | Compressor usually does not run continuously |
| Heating or cooling | Power × temperature-dependent operating time | Can significantly increase total consumption |
Which timer is suitable for the lighting?
A timer must be suitable for the actual switching load of the light and operate reliably over long periods.
The stated maximum load capacity of a timer does not always apply equally to every type of load. Electronic power supplies can briefly draw a higher current when switched on than during normal operation. This inrush current can place greater stress on contacts than the rated power alone would suggest.
For high-power lighting systems, a suitable contactor or purpose-designed load relay may be required. The timer then controls only the relay, while the actual load is switched through adequately rated contacts. Planning and connection should be carried out professionally.
Digital timers offer flexible programs, while mechanical models are simple to operate. Important features include power reserve, reliable restart after a power failure and a clearly defined manual switching option for maintenance work.
How do you protect a grow box from fire hazards?
Fire protection begins with tested equipment, correct electrical loading, flame-retardant materials and sufficient distance between heat sources and combustible surfaces.
Lights, power supplies and fans must not be covered with fabric, film or insulation unless this is explicitly intended. Ventilation openings on electrical devices must remain unobstructed. Dust deposits should be removed regularly because they can impair heat dissipation.
Cardboard, loose textiles, open-cell foams and improvised soundproofing increase the fire load. Wooden surfaces should also be treated professionally and not used directly next to hot components. Minimum clearances specified by the manufacturer must be observed.
Smoke alarms in the room where the box is located can provide early warning of smoke development. They do not replace safe installation, however. Fire extinguishers or extinguishing agents must be suitable for electrical equipment and positioned so that they remain accessible in an emergency without first having to approach a hazard source.
How can water be kept away from electrical devices?
Electrical components are mounted in elevated positions, cables are given drip loops, and watering areas are physically separated from plug connections and power supplies.
Power strips should not be placed on the floor or directly where watering takes place. Even a waterproof floor tray does not protect them from splashes or high humidity. Mounting them outside the box is often the safest solution.
Cables are routed so that water cannot run along the cable into a plug connection. A downward-hanging loop is formed before the connection. The lowest point lies below the plug connection so that any water running down the cable would drip off there.
Irrigation lines must be secured against slipping off. Automatic systems require regular leak checks. A single disconnected hose can release large amounts of water within a short time and reach electrical components despite the floor tray.
Does a grow box need a heater?
Additional heating is only necessary when room and root-zone temperatures remain consistently too low despite the lighting.
It is often more efficient to first heat the surrounding room or reduce heat losses. A small heater directly inside the grow box takes up space, locally dries the air and increases fire risk. Devices with exposed heating elements are particularly unsuitable near dry plant material and in humid environments.
Root zones on cold basement floors can be significantly cooler than the measured air. A pressure-resistant insulating layer beneath the box or pots can therefore be more effective than heating the entire air volume further. Heating mats must be suitable for the intended use and operated with temperature control.
Every heater increases the total electrical load. Thermostats and switching devices must be able to switch the power safely. Devices must never be covered by plants, films or pots.
Does a grow box need air conditioning?
Air conditioning only becomes useful when adequately sized exhaust ventilation and cool intake air can no longer control the temperature level.
Air conditioning should not be regarded as a replacement for functioning grow box ventilation. The system removes heat from the room, while the box still requires air exchange and odor filtration. Portable single-hose units can create strong negative pressure in the room through their exhaust hose and draw warm outside air in through gaps.
Split air-conditioning systems are usually more efficient but require professional installation. Condensate must be drained safely. Active cooling also changes relative humidity and can create cold surfaces on which water condenses.
Before buying one, check whether waste heat can be reduced through a more efficient light, external power supplies, a better exhaust route or a lower room temperature. Every unit of heat avoided does not later need to be removed by active cooling.
Which substrate is suitable for a grow box?
A suitable substrate stores enough water and nutrients while remaining loose and allowing good air exchange in the root zone.
Soil, coco coir, mineral substrates or hydroponic systems can be used in a grow box. Each medium places different demands on irrigation, nutrient supply, monitoring and technical equipment. For beginners, a high-quality, structurally stable soil is often easier to manage than a system that requires daily measurements and very precise nutrient solutions.
The substrate should not remain permanently compacted or completely waterlogged after watering. Roots need oxygen as well as water. Very fine, heavy mixes can develop oxygen-poor zones when combined with frequent watering. Very coarse mixes, by contrast, dry out faster and require water more often.
Weight also matters in a DIY grow box. Large pots filled with moist soil can be considerably heavier than expected. The floor panel, frame and supporting surface must be able to carry this load permanently.
Which pot size fits a grow box?
The appropriate pot size depends on the number of plants, available floor area, planned vegetative period and the properties of the substrate.
Large pots provide more root space and buffer short-term fluctuations in water and nutrients better. However, they take up a lot of floor area and their height reduces usable plant space. Small pots can be arranged more flexibly, dry out faster and require more precise watering.
The number of pots should not be determined solely by the available floor area. Enough space must remain between containers for air movement, drainage and inspections. Pots placed tightly together make it harder to remove excess water and can create humid, difficult-to-access zones.
Fabric pots provide good air exchange through the sides, but they release more moisture into the surroundings and can increase humidity. Plastic pots evaporate less through their side walls and are easy to clean. Regardless of material, sufficient drainage holes are required.
| Pot type | Advantages | Possible disadvantages |
|---|---|---|
| Plastic pot | Lightweight, inexpensive, easy to clean | Little air exchange through the side walls |
| Fabric pot | Good aeration of the outer root zone | Higher evaporation and harder to clean |
| Air-Pot or perforated pot | Strong air exchange and good drainage | Substrate dries faster and water can escape from the sides |
| Self-watering pot | More even water supply is possible | Works only with correct setup and a suitable nutrient solution |
How do you water plants correctly in a grow box?
Plants in a grow box should be watered according to their actual water needs rather than on a rigid schedule.
Water use and drying time change with plant mass, pot size, substrate, temperature, humidity and air movement. A pot that stays moist for several days at the beginning can later dry out within a short period. Therefore, regularly check the weight and moisture of the root ball.
Dry soil at the surface does not automatically mean that the entire pot needs water. Conversely, a moist surface can hide a dry lower root zone if only small amounts have been applied. The goal is even moisture throughout the usable root zone without permanently standing water.
Saucers must be checked after watering. If drainage water remains for a long time, humidity rises and the lower part of the pot can stay permanently wet. Automatic irrigation systems make watering easier, but still require checks for clogged drippers, leaks and uneven distribution. Further practical information on the correct amount of water and the right watering time can be found in our guide “How to water cannabis correctly”.
What kinds of water damage can occur in a grow box?
Water damage is caused mainly by overflowing saucers, disconnected irrigation hoses, leaking containers and unprotected joints in the floor area.
Even small, recurring amounts of water can cause wood-based materials to swell or allow moisture to collect beneath the box. Concealed areas behind rear panels, under floor panels or between the box and the building wall are particularly critical. Water can remain unnoticed there for a long time.
Automatic irrigation systems should use a limited reservoir volume, secure hose connections and, where appropriate, a leak sensor. A large tank positioned above the plant area can drain completely by gravity if a fault occurs. Pumps and valves must be arranged so that a single failure cannot release the entire water volume.
The floor tray should be checked regularly for damage. Small holes often become noticeable only after water has already entered the structure. Smooth protective pads beneath heavy pots help prevent punctures and abrasion when pots are moved.
How many plants fit in a grow box?
The suitable number of plants depends on the floor area, pot size, growth habit, lighting and the desired access.
More plants do not automatically mean better use of the space. If they are placed too close together, leaves overlap early, inspections become more difficult and air movement within the canopy decreases. A smaller number of easily accessible plants can therefore be easier to maintain.
The final canopy area is more important than the number of stems. A few plants can fill a large area after a longer vegetative period, while many smaller plants become dense sooner. Lighting and airflow must match the later leaf area, not only the situation immediately after the plants are placed inside.
Plan an accessible margin or a way to move pots. In a deep box without side access, plants at the back are difficult to inspect. Constructions deeper than about an arm’s length often require a second door or pull-out plant trays.
How should the interior be arranged?
The interior should provide short airflow paths, even lighting and clear access to plants, sensors and technical components.
Tall components do not automatically belong against the rear wall. What matters is whether they block light, obstruct airflow or make maintenance difficult. Filters and fans are often mounted in the upper area, while pots stand on a waterproof, easy-to-clean surface.
Sensors should hang freely and be adjustable in height as the canopy grows. Cables should be routed and secured along fixed edges. Loose cables between pots make cleaning more difficult and can be damaged when plants are removed.
Circulation fans must not be positioned where leaves can grow into the protective grille. When building the box, already consider how the plant area will develop over the coming weeks. Mounting rails or several prepared mounting points make later adjustments easier.
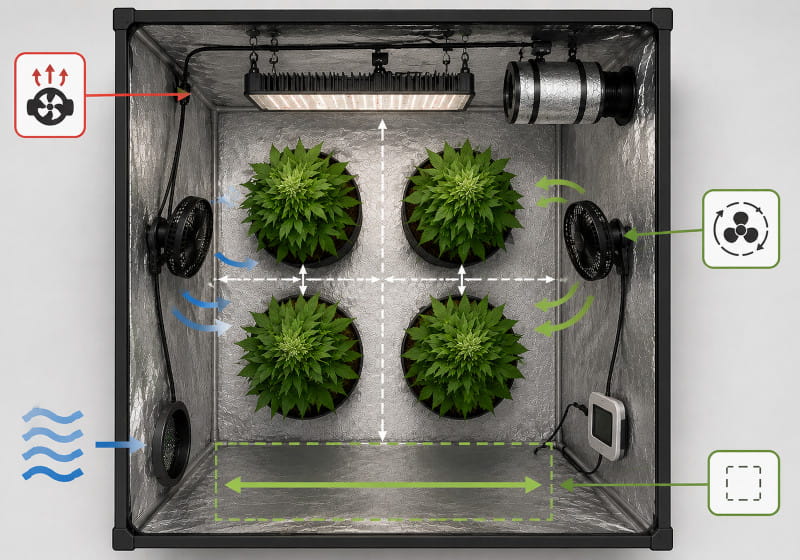
How can plant height be controlled in a grow box?
Plant height is controlled through suitable genetics, a limited vegetative period, appropriate pot size and gentle training.
Available height should already be considered when selecting a strain. Genetics with strong stretch require more distance from the light and can quickly become problematic in low DIY builds. More compact growth habits are usually easier to control in mini grow boxes.
Careful low-stress tying can distribute shoots horizontally and make more even use of the illuminated area. Ties must not cut into stems. They need to be checked regularly and adjusted as stems thicken.
Screens can support an even canopy but make it harder to remove individual pots. With permanently installed screens, access from several sides must therefore be possible. A poorly accessible plant cannot be isolated quickly if pest or disease problems occur.
How can a grow box be kept hygienic?
Hygiene means regularly removing plant debris, standing water, spilled substrate and dust while keeping all surfaces easily accessible.
Dead leaves should not remain for long on moist substrate or beneath pots. They can create favorable conditions for microorganisms and pests. Spilled soil in corners or air openings also makes cleaning more difficult.
Tools and reusable pots should be cleaned before a new cycle. New plants or cuttings should not be placed into an existing box without inspection. Leaf undersides, shoot junctions and substrate surfaces should be checked especially carefully.
Cleaning agents must be suitable for the existing surfaces and must not leave problematic residues. Electrical devices are switched off and protected from moisture before cleaning. After wet cleaning, the box must dry completely before it is closed and operated again.
| Check | Frequency | What should you watch for? |
|---|---|---|
| Floor tray | After every watering | Drainage water, leaks and plant debris |
| Intake filter | Regularly according to dust load | Reduced airflow and contamination |
| Circulation fans | Several times during a cycle | Dust on protective grilles and unusual noises |
| Walls and corners | Continuously and after every cycle | Condensation, deposits and damaged sealing |
| Tools and pots | Before reuse | Substrate residues, pests and organic deposits |
Which pests can occur in a grow box?
Pests found in grow boxes include spider mites, thrips, aphids, fungus gnats and whiteflies.
Enclosed spaces do not automatically prevent infestations. Pests often enter the cultivation area via new plants, substrate, clothing, animals or open windows. The warm, protected climate can accelerate their development.
Inspect leaf undersides and young shoots under good lighting. Yellow or blue sticky traps can indicate flying insects, but they are not sufficient to assess an infestation on their own. Spider mites and aphids often live directly on the plants and are not reliably detected on sticky traps.
Fungus gnats are encouraged by persistently moist, organic substrates. The adults are usually easy to see, while the larvae live in the substrate. Appropriate watering and a clean substrate surface are therefore part of prevention.
Which diseases are encouraged by a poor grow box climate?
Persistently high humidity, low air movement and wet plant surfaces mainly encourage fungal diseases and problems in the root zone.
Dense canopies dry more slowly and form localized humid zones. Conditions there can favor, among other things, mold and powdery mildew. A suitable hygrometer reading in the open area of the box does not rule out such microclimates.
Persistently wet substrate can restrict oxygen supply to the roots and encourage various root problems. Stronger air circulation above the pots does not correct waterlogging. Watering practices, substrate structure and drainage are decisive.
Affected plant parts should be identified early and treated separately. Tools must be cleaned after contact so that pathogens are not mechanically transferred to other plants. Cut material must not be left inside the box.
How can light leaks be checked and fixed?
Light leaks are most reliably detected by checking the illuminated grow box from the outside in a completely darkened room.
Check door gaps, corners, cable openings, air connections and joints between individual panels. Mark visible spots before switching the lighting off. Seals, overlaps or suitable baffles can then be added.
Adhesive tape alone is often not a permanent solution. Heat, humidity and repeated opening can reduce adhesion. Mechanically fastened profiles, sealing strips or sturdy light traps usually last longer and are easier to clean.
The box should also be checked from the inside to see whether light enters through openings during the dark period. A lightproof construction must not come at the expense of intake airflow, however. Air openings need light-blocking channels rather than complete blockage.
How is a grow box tested before first use?
Before first use, the fully equipped grow box should run for several hours without plants under realistic operating conditions.
Switch on the lighting, exhaust and circulation systems as they will later be operated. Measure temperature and humidity in the plant area and check whether unusually warm zones develop around the light, power supplies or cables.
Check the airflow at the exhaust outlet, the slight negative pressure and any whistling sounds at the intake. Open and close the door several times. It should neither be blocked by negative pressure nor catch on the seals.
Inspect all suspension points, duct clamps and cable fasteners. Vibrations can reveal loose components. After switching the system off, check how quickly the temperature falls and whether condensation forms on cold surfaces.
| Test point | Check | Warning sign |
|---|---|---|
| Temperature | Record the trend over several hours | Continuous rise without stabilization |
| Exhaust air | Check airflow and filter connection | Weak airflow despite a high fan setting |
| Intake air | Check negative pressure and intake noise | Whistling, heavily loaded door or hardly any incoming air |
| Electrical system | Check cables, plugs and switching devices for heat | Odor, discoloration, unusual heat or crackling noises |
| Noise | Assess with the door closed and from the adjacent room | Droning, rattling or strong transmission into building elements |
| Lightproofing | Check the box from outside in a dark room | Light at doors, joints or air openings |
How often should a grow box be maintained?
A grow box requires ongoing visual checks and thorough technical maintenance after every complete cycle.
Air filters, fan grilles and sensors should be checked regularly for dust. Contamination changes airflow and measurement accuracy. Unusual noises or vibrations should be investigated immediately rather than postponed until the next deep cleaning.
Check seals, hinges and closures for wear. Doors can warp due to humidity or mechanical stress. Small gaps are best corrected early before seals need to be replaced completely.
After a cycle, pots, floor tray, walls, suspension points and technical openings should be cleaned thoroughly. At the same time, check whether screws have loosened, films have been damaged or moisture has accumulated in edges and joints.
What costs are involved in building a grow box yourself?
Costs depend mainly on size, material quality, lighting, exhaust equipment and the tools already available.
The wooden structure or cladding alone often accounts for only part of the budget. A safe light, suitable activated carbon filter, adjustable exhaust fan, circulation fans, measuring instruments and electrical safety components can contribute much more to the total cost.
Very inexpensive DIY builds are often achieved by using unsuitable furniture, cardboard, thin films or overloaded electrical components. Such savings can later become expensive through moisture damage, excessive noise or safety problems.
Ongoing expenses must be considered in addition to acquisition costs. These include electricity, replacement of the activated carbon filter, prefilters, wear parts and, if necessary, room cooling or dehumidification.
| Cost area | Typical components | Potential savings |
|---|---|---|
| Construction | Frame, panels, door, seals and floor tray | Reuse existing suitable materials |
| Interior fitting | Bright surface, suspension hardware and light traps | Use a wipe-clean white surface instead of elaborate specialty film |
| Lighting | Light, driver, suspension and timer | Choose suitable rather than oversized power |
| Ventilation | Filter, exhaust fan, ducts and air circulation | Short airflow paths reduce the required fan power |
| Monitoring and safety | Sensors, switching equipment, cable protection and smoke alarms | Do not cut costs on safety-relevant components |
| Ongoing operation | Electricity, filter replacement and maintenance | Efficient equipment and a good room climate reduce follow-up costs |
Is a DIY grow box cheaper than a grow tent?
A DIY grow box can be cheaper if suitable materials and tools are already available, but it is not automatically less expensive when everything has to be purchased new.
A ready-made grow tent already includes reflective interior surfaces, openings, zippers and a frame. With a DIY build, these functions must be created individually. High-quality panels, fittings, seals and a sturdy door can increase the price considerably.
On the other hand, a custom build can be more durable and better adapted to the room. Damaged parts can be replaced individually, and heavy equipment can be mounted at reinforced points. With unusual dimensions, building your own box is often the only way to make sensible use of the available space.
The core technical components cost roughly the same with either option. A light, filter, fan and sensors are required regardless of whether the enclosure is built yourself or purchased ready-made.
Which mistakes are especially common when building a grow box?
The most common mistakes are insufficient internal height, incorrectly sized ventilation, unsuitable materials, difficult-to-access equipment and unsafe electrical installations.
Many problems arise before the first cut is made. If only the desired plant height is considered, there may later be insufficient space for the pot, light, suspension, filter and safety distance. The box can look large from the outside and still offer only a small usable plant area.
Another typical mistake is sizing the exhaust system solely according to the calculated internal volume. Real airflow falls because of the activated carbon filter, ducts, bends and small intake openings. A fan that appears sufficient on paper can move significantly less air in the completed system.
Poorly accessible equipment also causes long-term problems. Filters, prefilters, fans and cable connections must be inspectable and serviceable. If a component is permanently enclosed behind cladding, part of the grow box has to be dismantled for every cleaning.
| Mistake | Possible consequence | Better solution |
|---|---|---|
| Overall height too low | Too little distance between plants and light | Plan all components to scale before construction |
| Intake opening too small | Strong negative pressure, whistling and low airflow | Increase the free intake cross-section |
| Long, kinked exhaust duct | High pressure loss and more noise | Plan a short airflow path with wide bends |
| Power outlets on the floor | Contact with irrigation water or condensation | Mount electrical equipment in an elevated position and preferably outside |
| Loose reflective film | Blocked airflow paths and difficult cleaning | Secure film smoothly and mechanically |
| Heavy equipment mounted on a thin panel | Material failure or falling equipment | Attach the load to the frame and reinforced cross supports |
| No test operation | Problems are only discovered once plants are inside | Test the complete system for several hours in advance |
Why is undersized grow box ventilation a problem?
Undersized grow box ventilation cannot remove heat and moisture quickly enough and loses additional performance through filters and air ducts.
If the temperature rises continuously while the lighting is on, the box does not reach a stable equilibrium. At the same time, plants transpire water, which also increases the moisture load. A higher fan speed only helps if the fan still has performance reserve and sufficiently cool, dry air can flow in.
An undersized exhaust system often operates permanently at its limit. This increases noise and leaves no reserve for warmer outdoor temperatures, denser plant growth or an increasingly dirty prefilter. A larger adjustable fan can operate more quietly and flexibly under the same conditions.
Before installing a stronger device, however, the intake opening, filter condition and duct routing should be checked. A large fan cannot fully compensate for a blocked airflow path.
Why is oversized exhaust ventilation not automatically better?
Oversized exhaust ventilation can cause unnecessary noise, strong negative pressure and climate fluctuations that are difficult to control.
When a large amount of air is moved through small openings, air velocity and airflow noise increase. Doors can become difficult to open, seals are placed under stress and unfiltered air may be drawn in through unintended gaps.
With dry room air, an unnecessarily high air-change rate can sharply lower relative humidity. Energy consumption also rises. Generous performance reserve is useful, but it should be combined with suitable control.
The activated carbon filter also imposes limits. If more air is moved through it than intended, odor adsorption can decline. The highest fan output must therefore remain within the suitable operating range of the filter.
Why should the exhaust system not be switched off completely?
If the exhaust system is switched off completely, heat, humidity and odors can rise quickly inside the closed box.
Even during the dark period, plants and substrate continue to release water vapor. At the same time, the temperature falls, which often raises relative humidity. Without air exchange, condensation and persistently humid zones can develop.
A reduced minimum fan output is therefore often more sensible than switching the system off entirely. The required level depends on plant mass, room climate, box volume and moisture development. Data loggers help assess nighttime values.
Circulation fans do not replace this exchange. They only redistribute the existing air and cannot remove the increasing moisture from the system.
Why are cardboard and Styrofoam unsuitable for a grow box?
Cardboard and unsuitable foams are sensitive to moisture, difficult to clean hygienically and can increase the fire load.
Cardboard absorbs humidity and spilled water. As a result, it loses stability and can deform. Its porous surface cannot be cleaned reliably, allowing dust and organic residues to accumulate.
Many foams are highly flammable or can release problematic decomposition products when strongly heated. They should not be used close to lights, power supplies or electrical connections unless their suitability has been verified.
If the box is to be insulated from cold building surfaces, purpose-designed construction materials should be installed professionally outside the actual interior. Insulation must neither cover electrical devices nor create hidden moisture zones.
Why is aluminum foil not a good reflective surface?
Household aluminum foil tears easily, forms creases and distributes light less evenly than a smooth bright surface.
A heavily crumpled surface creates irregular reflections and is difficult to secure permanently. During cleaning, the thin foil can be damaged, while moisture and dust can collect behind loose sections.
White, matte and wipe-clean surfaces are usually more practical for a DIY build. They distribute light diffusely and can be cleaned without a delicate film construction.
If a special reflective film is used, it should be mounted smoothly, with few creases and mechanically secure. It must not cover ventilation openings or come into contact with moving fans.
Why should a grow box not stand directly against a cold wall?
Humid air can accumulate between a grow box and a cold wall and condense on the cool surface.
The rear of a closed box is often difficult to inspect after installation. If condensation forms there, it can remain unnoticed for a long time. Damp spots, damaged wall surfaces or mold may then be discovered only later.
Sufficient clearance allows air movement and regular visual inspections. Surface temperature should be monitored especially at exterior walls, in basements and on poorly insulated building elements.
The exhaust air must also not be directed into the narrow gap behind the grow box. Heat and water vapor would concentrate there and increase the risk of condensation.
How can you recognize poorly planned airflow?
Poor airflow is indicated by clear temperature differences, stagnant humid zones, whistling openings and weak exhaust flow.
If intake and exhaust are close together, part of the fresh air flows directly back out of the box. Rear corners or the area beneath the canopy receive little airflow. Multiple measuring points can make these differences visible.
Leaves moving strongly immediately in front of a fan while other areas remain still also indicate localized rather than even circulation. Airflow should be distributed without placing individual plants under constant strong stress.
Very weak airflow at the end of the duct can be caused by a dirty filter, kinked duct, incorrect airflow direction or undersized intake. The entire system must be checked step by step.
How can an existing grow box be improved?
An existing grow box can be improved by first measuring the actual weaknesses and then addressing them specifically.
For temperature problems, first document the trend with the lighting on. Then check intake-air temperature, airflow, filter condition and duct routing. A stronger fan only makes sense if the existing airflow path is sufficiently open.
Noise can often be reduced through vibration isolation, larger duct diameters and fewer tight bends. Light leaks can be closed with rigid overlaps and better door seals. Removable floor trays, additional doors or movable mounting rails can improve poor accessibility.
Modifications to the electrical system or load-bearing construction must be carried out professionally. The system must be completely de-energized before any change is made.
Can a grow box be expanded?
A grow box can be expanded if the frame, lighting, ventilation and electrical supply are reassessed for the larger area.
An additional side chamber or taller construction does more than increase internal volume. The illuminated area, plant mass and moisture production can also rise. The existing exhaust fan and activated carbon filter may then no longer be sufficient.
With modular constructions, individual wall sections can be replaced or added. Rigid panel boxes, on the other hand, often need new frame braces and a completely adapted door. Transitions between old and new components must be lightproof and airtight.
The electrical load must also be recalculated. A second light, additional fans or climate-control devices must not simply be connected to the existing power strip.
How do you build an especially quiet mini grow box?
A quiet mini grow box needs a generously sized, adjustable airflow path with low air velocity and vibration-isolated equipment.
The small size makes quiet operation more difficult because there is little room for large duct diameters and silencers. Small high-speed fans often produce clearly audible motor and airflow noise.
A somewhat larger fan positioned outside the box can operate more quietly at low speed. Flexible connectors and elastic suspension prevent vibrations from being transferred to the cabinet or enclosure.
The intake opening must be sufficiently large. A quiet fan will not remain quiet if the air whistles through a narrow gap. Light traps should therefore be built wide and with low airflow resistance.
Which grow box is suitable for small rooms?
A compact, sufficiently tall grow box with externally mounted equipment and well-controlled exhaust ventilation is suitable for small rooms.
A small floor area saves space, but insufficient height makes lighting and plant training more difficult. In a narrow room, a taller, slim construction can therefore be more practical than a very low, wide box.
Despite the compact box, the surrounding room must be able to absorb the discharged heat. In small storage rooms, exhaust air can build up quickly. Without a window, room ventilation or suitable discharge route, the intake-air temperature rises progressively.
Doors and maintenance access require space to open. Therefore, measure not only the footprint but also the working space in front of the grow box and the space required for air ducts behind or above the construction.
Can a grow box be placed in a basement?
A grow box can be placed in a basement if the room is dry, sufficiently temperature-controlled and well ventilated.
Basements often have cool floors and walls. This can cause the root zone and outer surfaces of the box to cool significantly. At the same time, relative humidity in some basements is already high, meaning the intake air can absorb only a limited amount of additional moisture.
A pressure-resistant insulating base can thermally separate the floor area. Sufficient clearance should remain between the grow box and basement wall for air movement and inspections.
The exhaust air must not be discharged into an unventilated basement room or cavity. The additional water vapor can worsen existing moisture problems. Room temperature and humidity should therefore be measured for several days before installation.
Can a grow box be placed in an attic?
An attic is suitable only if extreme summer heat, low winter temperatures, load-bearing capacity and fire safety can be reliably controlled.
Unfinished attic spaces can become extremely hot in summer. The intake air is then already so warm that even powerful exhaust ventilation can provide little cooling. In winter, by contrast, low temperatures and large differences between the light and dark periods can occur.
The load-bearing capacity of the floor must also be considered. Pots, water, panels and equipment create a substantial load on a small area. Unsuitable walkways or thin ceiling panels must not be loaded.
Dust, wooden components and difficult-to-access areas increase the requirements for fire protection and maintenance. Electrical cables must be installed professionally and protected from mechanical damage.
Can a grow box be placed in a bedroom?
A grow box can technically be placed in a bedroom, but noise, heat, air movement and electrical equipment can reduce room comfort.
Exhaust and circulation fans produce continuous noise. Even quiet devices can become noticeable at night through low-frequency humming or structure-borne vibration. Direct mounting to a wall or cabinet amplifies this transmission.
The discharged heat often enters the room and can raise the bedroom temperature. Even a well-filtered system requires controlled room ventilation. Windows may need to be opened more often, which can in turn introduce outside noise or temperature fluctuations.
Smoke alarms, clear escape routes and easily accessible electrical shutoff options are especially important. Access to the box must not be blocked by furniture or the bed.
How can a grow box be protected from unauthorized access?
A grow box should be secured so that children, pets and unauthorized persons cannot reach either the plants or electrical equipment.
A lockable door can prevent direct access. The lock and fittings must be sturdy enough but should not unnecessarily hinder rapid access for maintenance or emergency shutdown.
Cables, hoses and external filters should also not be freely accessible. Pets can damage lines or block air openings. Water reservoirs and nutrient products also belong in a secured area.
Legal requirements for securing cultivation differ depending on location. Current local regulations should be checked before construction begins.
Which ongoing checks are especially important?
Daily checks of climate, water, airflow, electrical equipment and visible plant condition are especially important.
Temperature and humidity should be considered not only as current readings, but also in terms of their daytime and nighttime peaks. A sudden change in the pattern can indicate a blocked filter, failed fan or open door.
Check the exhaust airflow, unusual noises and the temperature of electrical connections. Odor outside the box can also indicate a leaking connection, insufficient negative pressure or an exhausted activated carbon filter.
After watering, check saucers, the floor tray and irrigation hoses. Leaf undersides, shoot junctions and the substrate surface should be inspected regularly for pests or unusual changes.
| Inspection area | Daily check | Warning signal |
|---|---|---|
| Climate | Compare temperature and humidity | Unusually high peaks or large deviations |
| Exhaust air | Assess airflow and noise | Weak airflow, rattling or whistling |
| Electrical system | Visually inspect plugs, cables and devices | Odor, heat, discoloration or damaged insulation |
| Water | Check floor tray and saucers | Standing water or damp joints |
| Canopy | Inspect leaves, shoots and substrate | Spots, webbing, deposits or dead plant material |
What belongs on a grow box checklist?
A grow box checklist should cover construction, lighting, ventilation, electrical safety, water management, hygiene and test operation.
✓ The location is dry, load-bearing and easily accessible.
✓ The exhaust system can reliably remove heat and moisture from the room where the box is located.
✓ Internal dimensions allow for pot, plant height, light, suspension and filter.
✓ Wall and frame materials are stable, moisture-resistant and easy to clean.
✓ Doors, air openings and cable pass-throughs are fully planned.
✓ The system’s total electrical power is known.
✓ Heavy devices have reinforced mounting points.
✓ Floor tray and joints are waterproof.
✓ Exhaust, filter and duct connections are securely sealed.
✓ The intake area is sufficiently large and lightproof.
✓ Air circulation reaches the entire plant area.
✓ Electrical connections are elevated and dry.
✓ The light and filter have additional safety attachments.
✓ The box has been tested without plants under full load.
✓ Temperature, humidity, noise and negative pressure remain controllable.
Frequently Asked Questions About Building a Grow Box
Can you build a grow box completely yourself?
Yes, the enclosure, doors, interior lining and airflow paths can be built yourself, while electrical devices should be used as tested components. Lights, fans, controllers and power supplies should not be improvised or home-built. Work on the fixed electrical installation requires a qualified electrician.
Which wood is suitable for a grow box?
Dimensionally stable wood that is finished smooth and fully protected against moisture is suitable. Exposed edges, rough surfaces and untreated wood are difficult to clean and can absorb water. Required safety clearances must be observed near heat sources.
Can OSB panels be used for a grow box?
OSB panels can be used structurally, but inside the grow box they require a smooth, low-emission and moisture-resistant seal or coating. The rough surface and exposed cut edges are difficult to clean hygienically when untreated. The material’s respective emission class should also be taken into account.
Does a grow box have to be completely airtight?
No, a grow box must be lightproof and have controlled ventilation, but it does not need to be hermetically airtight. Air must be able to flow in through defined intake openings. Uncontrolled gaps should still be sealed so that slight negative pressure and filtered exhaust air are maintained.
How large does the intake opening of a grow box need to be?
The free intake area should be larger than the exhaust cross-section and must not be excessively restricted by light traps or filters. Whistling sounds, doors that are hard to open and weak exhaust airflow indicate that the intake is too small.
Where should the intake be placed in a grow box?
The intake is usually installed low down and as far away from the exhaust opening as possible. This allows the incoming air to travel through a larger part of the box. It should not hit a single plant directly as a cold, strong air stream.
Where should the exhaust be placed in a grow box?
The exhaust is usually mounted in the upper area because heated air collects there. The filter, fan and duct should form a short, airtight and as straight as possible airflow path.
Does every grow box need an activated carbon filter?
An activated carbon filter is required when odor-active exhaust air needs to be cleaned reliably. It must match the fan and actual airflow. A filter does not replace sufficient exhaust capacity or regular maintenance.
Can the activated carbon filter be mounted outside?
External mounting is possible if the filter design, airflow direction and connections are suitable for it. Unfiltered air escaping on the pressure side must be prevented by especially carefully sealed connections.
How often does the air in a grow box need to be exchanged?
A fixed air-change rate is only a rough starting point because heat, humidity, intake-air conditions and pressure losses determine the actual requirement. Test operation and measured day and night values are more informative than a single generalized formula.
Can the exhaust system be switched off at night?
Switching it off completely is often unfavorable because plants and substrate continue to release moisture. A reduced minimum output maintains air exchange and can limit the rise in relative humidity.
How many circulation fans does a grow box need?
The required number depends on box size, plant height and canopy density. Several small fans can often move the upper and lower areas more evenly than one powerful device.
How loud is a DIY grow box?
Noise levels depend mainly on the fan, air velocity, duct routing and structure-borne vibration. A larger throttled fan, sufficiently large airflow cross-sections and elastic suspension can make operation significantly quieter.
Can a mini grow box be operated silently?
Completely silent operation is hardly possible because air has to be moved and electrical devices have to be cooled. Low air velocity, externally mounted equipment and careful vibration isolation can nevertheless reduce noise substantially.
How do you prevent odor from escaping the grow box?
Odor is limited by a suitable activated carbon filter, airtight air connections and slight negative pressure. Open doors, damaged ducts or an exhausted filter can impair performance.
What color should the inside of a grow box be?
A bright, matte and wipe-clean interior surface is usually the most practical solution. It distributes light diffusely and is easier to clean than mirrors or crumpled aluminum foil.
Does a grow box need a floor tray?
A waterproof floor tray is highly recommended because it catches spilled irrigation water and small leaks. It should have raised edges and be checked regularly for damage.
How long does it take to build a grow box yourself?
Build time depends on size, material, experience and technical equipment. A simple cabinet conversion can be completed much faster than a completely new frame construction with doors, light traps and external airflow routing. Sufficient time should always be allowed for planning, curing of coatings and test operation.
Which is more important: lighting or ventilation?
Lighting and ventilation depend on each other and cannot sensibly be treated as competing priorities. A powerful light without suitable exhaust ventilation causes climate problems, while high-performance ventilation cannot compensate for poor light distribution.
How to Create a Grow Box That Works Reliably Long Term
A grow box that works reliably over the long term is created through realistic planning, safe materials, coordinated equipment and regular checks.
Building your own box allows dimensions, doors and technical connections to be adapted precisely to the available space. This advantage only becomes meaningful, however, when the grow box is planned not as a simple cabinet but as an integrated climate, lighting and safety system.
In particular, grow box ventilation determines whether heat and humidity remain controllable. Exhaust air, intake air and air circulation perform different tasks. The system can only work reliably when the filter, fan, airflow cross-sections and duct routing are properly matched.
Anyone who wants to build a mini grow box themselves needs to plan even more precisely. The small internal volume reacts quickly to heat, humidity and excessively strong airflow. Externally mounted power supplies, compact lighting and a short airflow path create more usable plant space.
A complete test run before first use shows whether lightproofing, temperature, humidity, negative pressure, noise and electrical load meet expectations. Even afterward, maintenance, hygiene and daily visual checks remain a permanent part of operation.