SCROG Growing: How to Use Screen of Green for Cannabis
SCROG Growing Guide: How to Use the Screen of Green Method for Cannabis
Updated: June 2026 | SCROG for cannabis – get the most out of your plants with Screen of Green
Author: Cannapot Grow Team | Reading time: eighteen minutes
The Most Important Things At A Glance
If you have been growing cannabis indoors for a while, you have probably hit a point where you want more from each grow. More yield, better light coverage, fewer wasted bud sites sitting in the dark. That is exactly where the SCROG technique comes in. It is not complicated, but it does reward growers who pay attention and stay consistent during the vegetative phase.
This guide covers everything from the very basics of what a SCROG actually is, through to setting up your net, training your plants week by week, and avoiding the mistakes that trip up most first-time scroggers. We have also included a comparison with the SOG method, specific advice for autoflowering strains, and strain recommendations you can find directly in the Cannapot Seed Shop.
What is SCROG?
SCROG stands for Screen of Green. It is a plant training technique where you stretch a horizontal mesh or net above your cannabis plants and guide their branches through the holes as they grow. The goal is to stop the plant growing straight up like a Christmas tree and instead spread it out flat, so every bud site ends up at roughly the same height under the light.
Without any training, a cannabis plant focuses most of its energy on the main central cola at the top. The lower branches get shaded out and produce small, airy buds that barely contribute to the final harvest. A SCROG setup removes that problem. Every branch gets pushed sideways across the screen, every bud site ends up level with the others, and every flower gets the same intensity of light from above.
The act of doing this is called scrogging, and growers also write it as ScrOG or SCRoG. All three mean exactly the same thing.
Where did SCROG come from?
The technique developed among indoor growers in the Netherlands during the 1970s and 1980s. Space was tight, lights were expensive to run, and growers were looking for ways to squeeze more out of a small area with as few plants as possible. The screen gave them a way to do that. From the Netherlands the method spread through the global indoor growing community and has been a standard technique ever since.
Want to understand more about indoor cannabis cultivation in general? Our Cannabis Grow Guides section covers the full picture from beginner setups through to advanced techniques.
Benefits of the Screen of Green Method
There are quite a few reasons why experienced indoor growers keep coming back to SCROG grows. Here are the main ones worth knowing about before you decide if the method is right for your setup.
Every bud site gets equal light
This is the core advantage. A flat canopy means the light hangs directly above every flower site at the same distance. No branch is hiding in the shadow of another. Each bud site gets the same photon count and develops to its full potential. With an untrained plant, the light has to stay high enough to avoid burning the main cola, which means the lower branches are operating at a fraction of the available light intensity.
Heavier yields from fewer plants
Because every bud site is producing at full efficiency, the weight at harvest goes up noticeably compared to an untrained plant of the same strain under the same light. Growers typically report yield increases of 20 to 40 percent, though the actual result depends heavily on genetics, light quality, and how well the grow is managed overall. More importantly, you can fill an entire screen with just one or two plants, which matters a lot in places where there are legal limits on plant numbers.
Better airflow through the canopy
A horizontal canopy spread across a net allows air to move both above and below the screen. Good airflow keeps humidity in check, lowers the risk of mould developing in dense bud clusters, and helps maintain stable temperatures across the whole grow space. If you add a clip fan pointed at the underside of the canopy, the improvement is even more noticeable.
Full use of your grow space
Most grow tents have corners and edges that untrained plants simply never reach. A SCROG forces the plant to spread into every corner of the available area, so you are paying for light that is actually doing useful work rather than bouncing off the walls.
Height control
This one matters particularly in tents with limited vertical height. By training branches horizontally you are actively preventing the plant from shooting upward toward the light. The screen becomes a ceiling of sorts. This is also useful for outdoor growers who want to keep plants low for privacy or to manage them in exposed locations.
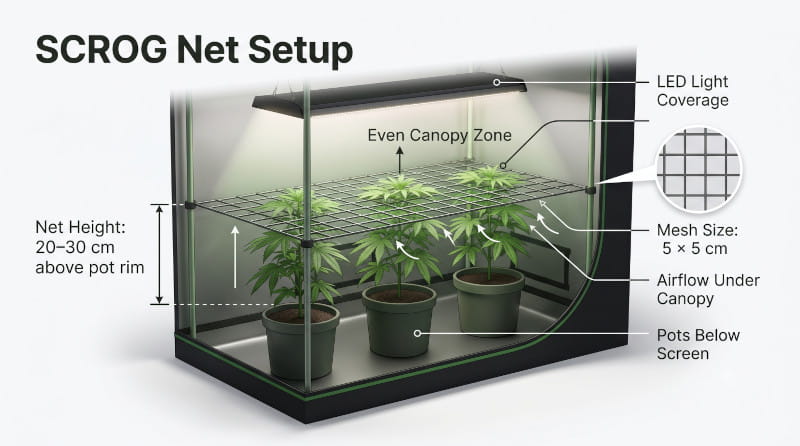
Net height
Place the screen somewhere between 20 and 30 centimetres above the rim of your pots. At this height the plants have enough vertical space to develop proper branching structure before they reach the net. It also gives you clearance underneath for watering, feeding, and checking on root health. If the net is too close to the pots the branches reach it before they are strong enough to train well.
Mesh size
A mesh opening of 5 by 5 centimetres works well for the majority of grows. It is large enough to weave branches through comfortably, including thicker stems later in the vegetative phase, and small enough to give good support to heavy buds once flowering is underway. Some growers go slightly larger with 7 by 7 centimetre or even 10 by 10 centimetre holes when working with plants that have particularly thick lateral branches.
Grow tent size and net size reference
|
Tent size |
Net size to use |
Plants needed (photoperiod) |
Plants needed (autoflower) |
|
60 x 60 cm |
55 x 55 cm |
1 plant |
1 to 2 plants |
|
80 x 80 cm |
75 x 75 cm |
1 to 2 plants |
2 to 3 plants |
|
100 x 100 cm |
95 x 95 cm |
1 to 2 plants |
2 to 4 plants |
|
120 x 120 cm |
115 x 115 cm |
2 to 4 plants |
4 to 6 plants |
|
150 x 150 cm |
140 x 140 cm |
4 to 6 plants |
6 to 9 plants |
Net materials
Nylon netting is the most popular choice among home growers. It is lightweight, easy to work with, and widely available in pre-cut sizes. The mesh is flexible enough to weave young branches through without damaging them.
String or twine stretched across a wooden or metal frame is a solid DIY option. Hemp cord works particularly well. The main advantage of string is that you can remove individual sections if you need to access a specific part of the canopy without dismantling the whole frame.
Wire mesh or metal fencing is more rigid and provides excellent support for very heavy buds. It is harder to work with during training but worth considering if you are growing large plants with thick branches that push against softer netting.
Plastic trellis netting from a garden centre sits somewhere between nylon and wire in terms of stiffness. It is cheap, widely available, and perfectly functional for most SCROG setups.
Fixing the net in a tent
In most grow tents the simplest approach is to attach the corners and edges of the netting directly to the tent's internal support poles using cable ties or Velcro straps. Make sure you pull the net tight on all sides before you start training. A slack net sags under the weight of developing buds and makes it much harder to keep an even canopy level. For a freestanding grow space, a simple rectangular frame built from PVC pipe and connectors can be assembled in a few minutes and gives you a rigid, adjustable platform to work with.
Step-by-Step SCROG Training Guide
The process breaks down into eight stages. Read through all of them before you start so you have the full picture of where each step is heading.
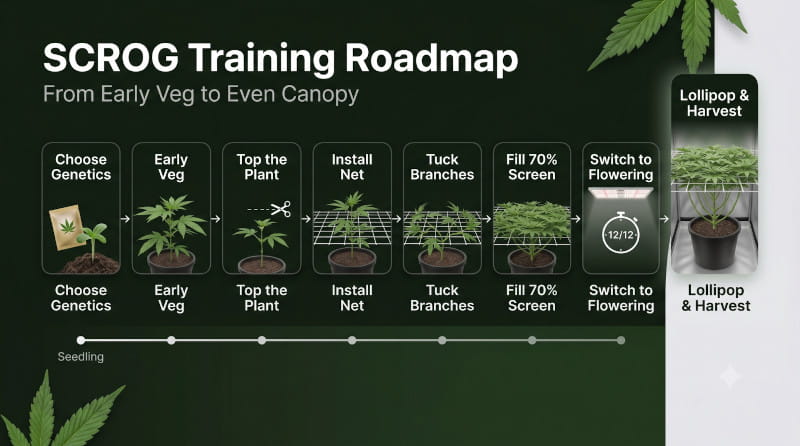
Step 1: Pick the right genetics
Your strain choice has a big impact on how your SCROG performs. Photoperiod plants are the easiest to work with because you control exactly when they flower, giving you as much vegetative time as you need to fill the screen. Strains with a natural tendency to stretch and branch well suit SCROG growing particularly well. Sativa-dominant genetics tend to fill a screen fast. Indica-dominant plants can work too but usually need more plants or a longer veg period to achieve the same coverage.
Browse the full seed range at Cannapot or use the Strain Finder to narrow down strains by genetics, seed type, and grow characteristics.
Step 2: Germinate and grow through early veg
Germinate your seeds and let the seedlings establish themselves through the first two to three weeks of vegetative growth before thinking about the net at all. At this stage the plant needs to focus entirely on developing a strong root system and healthy branching structure. Rushing the net in too early is one of the most common mistakes first-time scroggers make.
If you are new to germinating cannabis seeds, the Cannapot guide to cannabis seed types is a good starting point before you begin.
Step 3: Top the plant
Once the plant has developed five to seven nodes, cut the very top growing tip cleanly. This is called topping, and it splits one dominant central cola into two new equal growing tips. Those two tips can be topped again later to produce four, and so on. Multiple equal branches fill a screen far more evenly than a single dominant central stem ever could. Allow three to five days of recovery after each topping before doing anything else to the plant.
Step 4: Install the net and start tucking
When the branches are actively growing and reaching up toward the space where the net will sit, go ahead and install it. As branches grow up through the mesh, gently bend them back down and guide them through an open square in a direction where there is still empty screen to fill. This is the tucking action that gives SCROG growing its rhythm. Check the plants every day or every other day during this phase. Each branch you tuck will grow back up through the mesh within a day or two, and you simply tuck it again into the next available square.
Step 5: Keep going until the screen is 70 percent full
Continue tucking until roughly 70 percent of the screen is covered with green canopy. Do not wait until it is completely full. The plant will stretch significantly during the first two weeks of flowering and fill the remaining space naturally during that period. Flipping to flower with a completely packed screen almost always leads to an overgrown, difficult-to-manage canopy by week three of flowering.
Step 6: Switch to flowering
Change your light schedule to 12 hours on and 12 hours off to trigger the flowering phase. Keep tucking during the first two weeks of flowering as the plant stretches and fills the last gaps in the screen. After the stretch phase slows down, generally around weeks two to three of flowering, stop all tucking and weaving.
Step 7: Lollipop the lower growth
Once the canopy is established and flowering has begun in earnest, remove all the small branches and leaves growing below the screen. These lower growth points receive almost no light through the dense canopy above and will only produce tiny, loose popcorn buds. Removing them redirects the plant's energy entirely toward the main colas above the screen, and the difference in final bud size and density is very noticeable.
Step 8: Harvest
Because every bud site has received equal light throughout the grow, the flowers tend to ripen at a much more uniform rate compared to untrained plants. Use a jeweller's loupe or digital microscope to check trichome development across the canopy and harvest when the trichomes have reached the maturity you are aiming for.
Why Topping and SCROG Go Together
Technically you can scrog a plant without topping it first, but the results are nowhere near as good. An untopped plant has one dominant growing tip that races ahead of everything else. In a SCROG setup this creates an uneven canopy where one corner of the screen fills quickly while the rest of the plant struggles to keep up. Topping removes that dominant tip and forces the plant to redistribute its growth energy equally between multiple branches.
When to top
The right time to top is when the plant has developed between five and seven nodes. At this stage there is enough leaf mass to support recovery but the plant has not yet committed too much energy to vertical growth. For most indoor photoperiod strains this happens somewhere between three and five weeks from germination. Top just above the node cleanly with a sterilised blade or scissors, and then leave the plant alone for several days while the two new growing tips establish themselves.
How many times to top
One topping produces two main branches. A second topping of those two branches gives you four. A third round gives you eight. For a 60 by 60 centimetre screen, one or two rounds of topping is usually plenty. For screens of 100 centimetres or larger, two or three rounds will generate enough branches to fill the area faster and more evenly. Each additional topping adds roughly a week to your vegetative period as the plant recovers, but the extra canopy coverage is well worth it.
What about FIMming?
FIMming is a variation on topping where instead of making a clean cut you remove about 75 to 80 percent of the growing tip rather than the whole thing. Done correctly it can produce three to six new shoots from one cut point rather than the two you get from a standard top. The results are less predictable than topping, but growers who want to generate maximum branch count for a large screen sometimes prefer it. Both techniques work well with SCROG and choosing between them mostly comes down to personal preference. You can read more about cannabis training techniques including topping, FIMming, and LST in the Cannapot Cannabis Grow Guide section.
Can You SCROG Autoflowers?
Yes, but it works differently than it does with photoperiod plants. The main challenge with autoflowering strains is that they start flowering based on age rather than light schedule. You cannot extend the vegetative phase to give yourself more training time. The window for filling the screen is simply shorter, so the approach has to change accordingly. Looking for autoflowering seeds? Cannapot stocks a wide selection in the autoflowering cannabis seeds section.
The key differences when scrogging autos
Start training earlier. With photoperiod plants you have the luxury of waiting until the plant has good branching structure before installing the net. With autoflowers you need to have the net in place by weeks two to three from germination, when the plant is around 20 to 30 centimetres tall. That is also the ideal window to begin gentle training.
Go easy on topping. Topping an autoflower carries more risk than topping a photoperiod plant because autos have very little time to recover from stress. If you do top, do it only once and only when the plant has developed its third or fourth node, which is usually around week two to three. Watch the plant closely for the following few days. Many growers skip topping altogether with autoflowers and focus entirely on low stress bending and weaving through the net instead.
Aim for 60 to 70 percent screen coverage before flowering starts. With autos you may not fill the screen completely before the plant switches to flower on its own. That is fine. Even partial coverage gives you a meaningful improvement in light distribution and yield compared to an untrained plant.
Stop all training as soon as buds appear. Once pistils are visible, leave the plant completely alone. Moving or stressing a flowering autoflower can slow bud development significantly.
Autoflower SCROG week-by-week guide
|
Week |
Plant stage |
What to do |
|
Week 1 to 2 |
Seedling |
No training. Let the plant build roots and develop its first nodes undisturbed. |
|
Week 2 to 3 |
Early veg |
Install net. Begin gentle LST. Optional single topping at node 3 or 4 for robust strains only. |
|
Week 3 to 4 |
Vegetative |
Active tucking and weaving. Spread branches as wide as possible before flowering begins. |
|
Week 4 to 5 |
Pre-flower |
Continue gentle tucking. Stop as soon as first real buds form. |
|
Week 5 to 6 |
Early flower |
All training stops. Remove lower growth below the screen. Switch to flowering nutrients. |
|
Week 6 onwards |
Flower and ripening |
No training at all. Monitor trichomes, water and feed as normal, and harvest when ready. |
For more information on how autoflowering seeds behave compared to feminised and regular types, check out the Cannapot - Growing autoflowering cannabis.
SCROG vs SOG: Which One Suits Your Grow?
These two techniques get compared a lot because they sound similar and both aim to maximise yield from a given grow space. In practice they are quite different approaches and suit different growing situations. Here is a breakdown of the key differences.
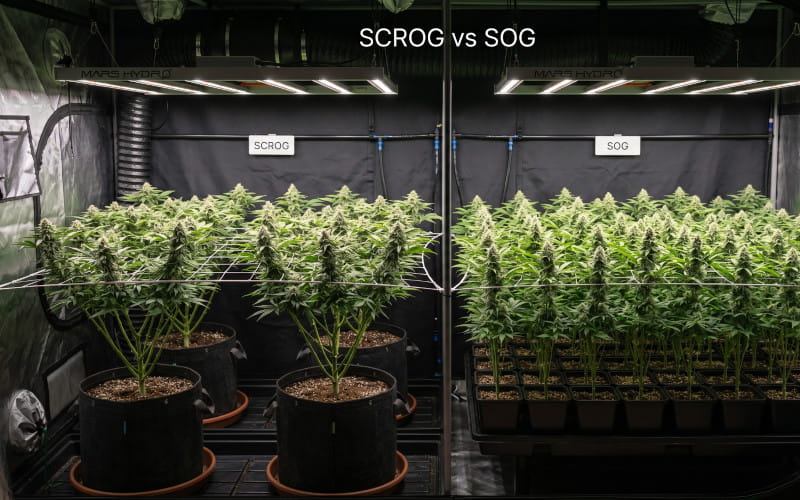
The basic difference
SCROG uses a small number of plants trained extensively over a longer vegetative period. Each plant is encouraged to spread its branches widely across a screen, producing many bud sites per plant. SOG takes the opposite approach. You pack many small plants into the same space, give them almost no vegetative growth time, and flip them to flower early. Each plant produces just one main cola, but because there are many plants, the combined yield is comparable.
Head to head comparison
|
Factor |
SCROG |
SOG |
|
Plants per square metre |
1 to 4 |
12 to 25 or more |
|
Vegetative time needed |
4 to 10 weeks |
1 to 2 weeks |
|
Container size |
Large (20 to 50 litres or more) |
Small (4 to 6 litres) |
|
Training involved |
High (topping, tucking, LST) |
Very low |
|
Bud structure |
Many large colas per plant |
One large cola per plant |
|
Total cycle time |
12 to 16 weeks typically |
9 to 11 weeks typically |
|
Best strain type |
Sativa or sativa-dominant hybrid |
Indica or indica-dominant hybrid |
|
Works well with seeds |
Yes, ideal choice |
Yes, though clones are often preferred |
|
Best suited to |
Limited plant counts, seed growers, maximum quality per plant |
Clone growers, maximum harvests per year, fast turnover |
Which should you choose?
Go with SCROG if you are growing from seed, have a legal plant count limit, grow sativa-dominant genetics that naturally stretch and branch, or simply want to get the most out of each individual plant. SCROG rewards patience and attention during the vegetative phase with genuinely impressive results at harvest.
Go with SOG if you work with clones from a mother plant, want to harvest as many times per year as possible, grow compact indica-dominant strains, and are less concerned about maximising quality per plant than maximising annual total output.
Neither method is objectively better. They suit different situations, different legal environments, and different growing styles.
Best Strains for SCROG
Almost any cannabis strain can be grown in a SCROG, but some genetics respond much better to this style of training than others. Here is what to look for when choosing seeds specifically for a screen grow.
What makes a good SCROG strain
Heavy lateral branching. A plant that produces lots of side branches fills a screen faster and generates more bud sites. Look for strains described as vigorous branchers.
Flexible stems. Branches that snap easily when bent are frustrating to train. Strains with naturally supple stems handle the weaving process much more smoothly, especially in the later stages of vegetative growth when branches thicken up.
Medium to tall height. Very short compact indica plants can be used but typically require more plants to fill the same screen area. Taller, stretchier genetics fill a net faster with fewer plants.
Photoperiod genetics. As we covered in the autoflower section, photoperiod plants let you control when flowering begins. This control is what allows you to extend vegetative growth for as long as needed to fully cover the screen before flipping.
Mould resistance. A dense SCROG canopy traps humidity between the buds more than a traditionally grown plant does. Strains with natural resistance to Botrytis and powdery mildew are considerably easier to manage in this style of grow.
Strain type guide for SCROG
|
Strain type |
SCROG suitability |
Notes |
|
Sativa-dominant hybrid |
Excellent |
Natural stretch fills screens quickly. Long flowering times are rewarded by SCROG's light efficiency. |
|
Balanced hybrid (50/50) |
Very good |
Combines stretch with manageable height. Often the easiest all-round option for beginners to SCROG. |
|
Indica-dominant hybrid |
Good |
Works well with two to four plants per screen. Less natural stretch but manageable with early topping. |
|
Pure Sativa |
Very good (advanced growers) |
Extreme stretch requires active management throughout. Rewards are exceptional yield and quality. |
|
Autoflower |
Moderate |
Possible with the modified approach described in the autoflower section above. |
Recommended varieties to consider
Some of the most consistently well-performing SCROG genetics include Airborne G13, Matanuska Tundra, Rickys Hash Plant, Blueberry, Ice T's Body Count, Blueberry Muffin and Blue Dream. These strains have become popular in SCROG grows precisely because they tick most of the boxes above. They branch well, handle the training process without too much stress, and produce dense, heavy colas when every bud site has good light access.
You can browse all feminised cannabis seeds at Cannapot to find the right strain for your next SCROG grow. For photoperiod sativa-dominant varieties specifically, the Strainfinder lets you filter by genetics and seed type to narrow things down quickly. If you want personal advice on which strain suits your specific tent size and experience level, the CannapotGPT seed advisor is worth a few minutes of your time.
Common SCROG Mistakes and How to Avoid Them
Most problems growers run into with SCROG are avoidable once you know what to watch out for. These are the ones that come up most often.
Starting to tuck before the plant is ready
Putting the net up and trying to train branches when the plant only has two or three nodes is a waste of time. You end up moving the same small number of branches over and over with nothing left to fill the remaining screen space. Wait until the plant has been topped at least once and has at least five or six lateral branches growing actively. That is when the training starts paying off.
Skipping the topping step
Without topping, the plant keeps its dominant central tip. One area of your screen fills up quickly while the surrounding zones stay empty for weeks. The finished canopy ends up uneven and the bud development reflects that unevenness at harvest. A single topping session early in veg fixes this problem entirely and takes about thirty seconds to do.
Flipping to flower with a full screen
If the screen is already at 100 percent coverage when you switch to a 12/12 light schedule, the stretch phase in early flowering will push the canopy well above the net with nowhere left to go. Branches pile up on top of each other and the canopy becomes dense, humid, and very prone to mould. Flip when the screen is around 70 percent covered and let the natural stretch during early flower take care of the rest.
Snapping branches during training
Trying to weave older, thicker branches through tight mesh squares puts a lot of stress on the stem. If the branch snaps, the damage can be serious. The fix is simple: train new growth early, while the stems are still young and pliable. Branches two to five centimetres above the screen are easy to weave. The same branches left for another week become stiff enough to cause problems. If you do snap something, tape a firm splint around the break and keep conditions stable. Most cannabis branches will knit back together within a week if the split is not too severe.
Leaving all the lower growth in place
Once your canopy is established and flowering has started, every branch below the screen is competing for resources it will never turn into worthwhile yield. Small undergrowth sites produce loose, underdeveloped buds that are not worth the energy the plant puts into them. Lollipop thoroughly once you flip to flower and again during the first week of flowering if new lower growth appears. The improvement in top bud density is real and measurable.
Continuing to tuck and train after week three of flowering
Moving buds that have already started developing stresses the plant at a time when it needs stability. Continuing to train into mid or late flowering can delay maturation, reduce terpene production, and in some cases cause structural problems with bud development. Once you are three weeks into flowering, put the training away and let the plant finish its job.
Using regular seeds without sexing plants early
SCROG involves weeks of vegetative training. Finding a male plant in a carefully built screen is one of the most frustrating things that can happen in the grow room, and dismantling the whole net to remove it is genuinely tedious. The simple solution is to use feminised seeds, which are bred to produce female plants almost without exception. If you prefer to work with regular genetics, sex your plants early under 12/12 and confirm females before you start building the screen.
Frequently Asked Questions About SCROG
How many plants do I need for a SCROG?
For photoperiod strains in a standard 100 by 100 centimetre tent, one to two plants with a generous vegetative period of six to ten weeks is plenty. One well-trained plant can fill a 100 centimetre screen on its own given enough time. Autoflowers need a bit more help due to their shorter training window, so two to four plants per screen is more realistic for consistent coverage.
Can you SCROG with just one plant?
Absolutely. One plant grown from a quality feminised seed, topped twice and given eight to ten weeks of vegetative growth, can fill a 100 by 100 centimetre screen completely. Growing with a single plant also simplifies feeding, reduces the risk of spreading any problems between plants, and in many regions reduces legal risk. It is a very popular approach for home growers working within plant count limits.
When should I stop tucking and weaving?
Stop around two to three weeks into the flowering phase. By this point the bud sites are establishing themselves and need stability rather than continued movement. Keep an eye on any branches that are still growing rapidly and tuck those if needed up to about week three, but after that leave everything alone until harvest.
Does SCROG work outdoors?
It does, and it works very well for managing the height and spread of large sativa plants outdoors. Build a rectangular frame from wood or PVC pipe around the plant and stretch netting across it at the appropriate height. Guide branches through the mesh as they grow, exactly the same as you would indoors. Outdoor SCROG is also a useful privacy technique, keeping plants low and inconspicuous without sacrificing yield. Learn more in the outdoor growing section of the Cannapot Cannabis Grow Guide.
What mesh size is best?
5 by 5 centimetres is the standard recommendation and works well for the large majority of grows. Go slightly larger, up to 10 by 10 centimetres, if you are working with especially thick-stemmed strains or have had trouble weaving branches through tighter mesh in the past.
How high above the pots should the net sit?
Between 20 and 30 centimetres above the rim of the pots. This gives the plants enough vertical space to develop proper branch structure before they reach the net and leaves enough clearance below for watering, feeding, and airflow management.
How much does SCROG actually increase yield?
The honest answer is that it depends significantly on genetics, light quality, and how well the grow is managed overall. Most growers report increases of 20 to 40 percent compared to the same strain grown untrained under the same light. In setups with high-quality LED lighting and well-selected genetics, the improvement can be even more substantial. The yield gains come from giving every bud site the same light intensity, which is something you simply cannot achieve with an untrained plant.
SCROG versus LST: what is the difference?
Low Stress Training (LST) refers to any technique that bends and ties branches without cutting them. SCROG is a specific and systematic form of LST that uses a horizontal screen to organise the entire plant into a flat canopy. You can use LST techniques like tying branches to the pot rim as a precursor to SCROG, and many growers combine the two approaches during the early vegetative phase before the net is in place.
Can I use a SCROG with CBD strains?
Yes, CBD strains respond to the SCROG technique just as well as THC-dominant varieties. The same principles apply: good branching structure, even canopy, consistent light coverage. If you are interested in growing CBD-rich plants, Cannapot stocks a dedicated range of CBD cannabis seeds from verified breeders.
The Screen of Green method has been earning its reputation among cannabis growers for decades, and the reason is simple: it genuinely works. Training takes a bit of daily effort during the vegetative phase, but the payoff at harvest is consistent and repeatable once you have been through the process a couple of times. Heavier yields, more uniform buds, and better use of your grow space are realistic outcomes for anyone willing to put in the time.
Start with a quality feminised or photoperiod seed, take the time to top properly before training begins, flip when the screen is around 70 percent covered, and lollipop once flowering is underway. Those four things alone will put most first-time SCROG growers in a very good position come harvest day.
If you are ready to pick your seeds, the Cannapot Seedshop carries genetics from over a hundred breeders worldwide, with strain information, growing characteristics, and reviews to help you make the right choice. For personalised recommendations based on your grow setup and experience level, try the CannapotGPT seed advisor. And if you want to keep learning about growing techniques beyond SCROG, the full Cannapot Canna Wiki covers everything from beginner setups through to advanced cultivation methods.