Beginner Cannabis Grow Setup - Indoor
Beginner Cannabis Grow Setup: What You Really Need to Think About Before You Start
Updated: March 2026 | Beginner Cannabis Grow Setup: Indoor Starter Guide | Cannapot
Author: Cannapot Grow Team | Reading time: approximately fourteen minutes
The Most Important Things At A Glance
✓ A beginner grow setup does not need to be complicated — small, stable indoor environments usually work best.
✓ LED lighting, airflow, a carbon filter, fabric pots and a simple soil mix are the core essentials for beginners.
✓ Feminized seeds offer maximum control, while autoflowers simplify the process by removing light-cycle changes.
✓ Overcomplicated setups, incorrect pH, overwatering and poor ventilation are among the most common beginner mistakes.
A beginner cannabis grow setup sounds simple when you first hear it. Then you start reading, and suddenly there are tents, lights, filters, airflow, seed types, nutrients, mediums, and a hundred opinions pulling you in different directions. That is usually the point where beginners stop feeling excited and start feeling stuck.
The good news is that a beginner setup does not need to be complicated or insanely expensive to be effective. In fact, most new growers do better when they stop chasing the “perfect” commercial build and focus on something smaller, cleaner, and easier to manage. A complete, high-quality small tent setup can typically be built for around $300 to $500. The best cannabis grow setup for a first-timer is the one that matches your available space, your daily schedule, and the type of seeds you want to grow.
That is where planning matters more than buying. Before anything else, understand what your setup is supposed to do: create a stable indoor environment, make observation easy, and reduce early mistakes. If you want a broader introduction before diving into equipment, Cannapot’s guide on growing cannabis with no experience is the perfect place to begin.
What a Beginner Cannabis Grow Setup Actually Means
A lot of people hear “setup” and immediately picture a warehouse full of equipment. For beginners, that is the wrong image. A beginner cannabis grow setup is simply a controlled space that helps you stay organized and consistent. It gives your plants a stable home.
You are not looking for a large-scale system; you need a clear, realistic starting point. You should be able to understand what each part is doing, why it is there, and how to maintain it. This is why so many new growers start by learning the basics of growing cannabis indoors. Indoor growing gives you structure, and structure makes your first grow infinitely easier to manage.
Why Beginners Usually Start Indoors
For most, a grow setup indoor approach makes more sense than battling the unpredictable elements outdoors. Indoors, you can create a dedicated area, keep your tools in one place, and build a daily routine around your space.
A beginner cannabis indoor setup also makes learning easier. When the grow lives in one defined area, you can easily spot changes in your plants, notice patterns in their growth, and avoid rushed decision-making. Compact indoor spaces and tent-based setups offer privacy, organization, and a contained environment, which is exactly what a first-time grower needs.
Start With the Space, Not the Shopping List
One of the biggest mistakes you can make is shopping first and planning later. It feels productive, but it usually creates expensive confusion. A smarter approach is to start with the physical space you actually have.
Before looking at specific gear, ask yourself:
-
Do you have a secure indoor area that can be kept private and organized?
-
Is the space easy to access without turning simple daily checks into a chore?
-
Are you working within a realistic beginner budget (typically $300 to $500)?
-
Can you realistically stay consistent with daily watering and monitoring?
-
Does the room have access to electrical outlets and decent ventilation?
The Main Parts of a Beginner Setup
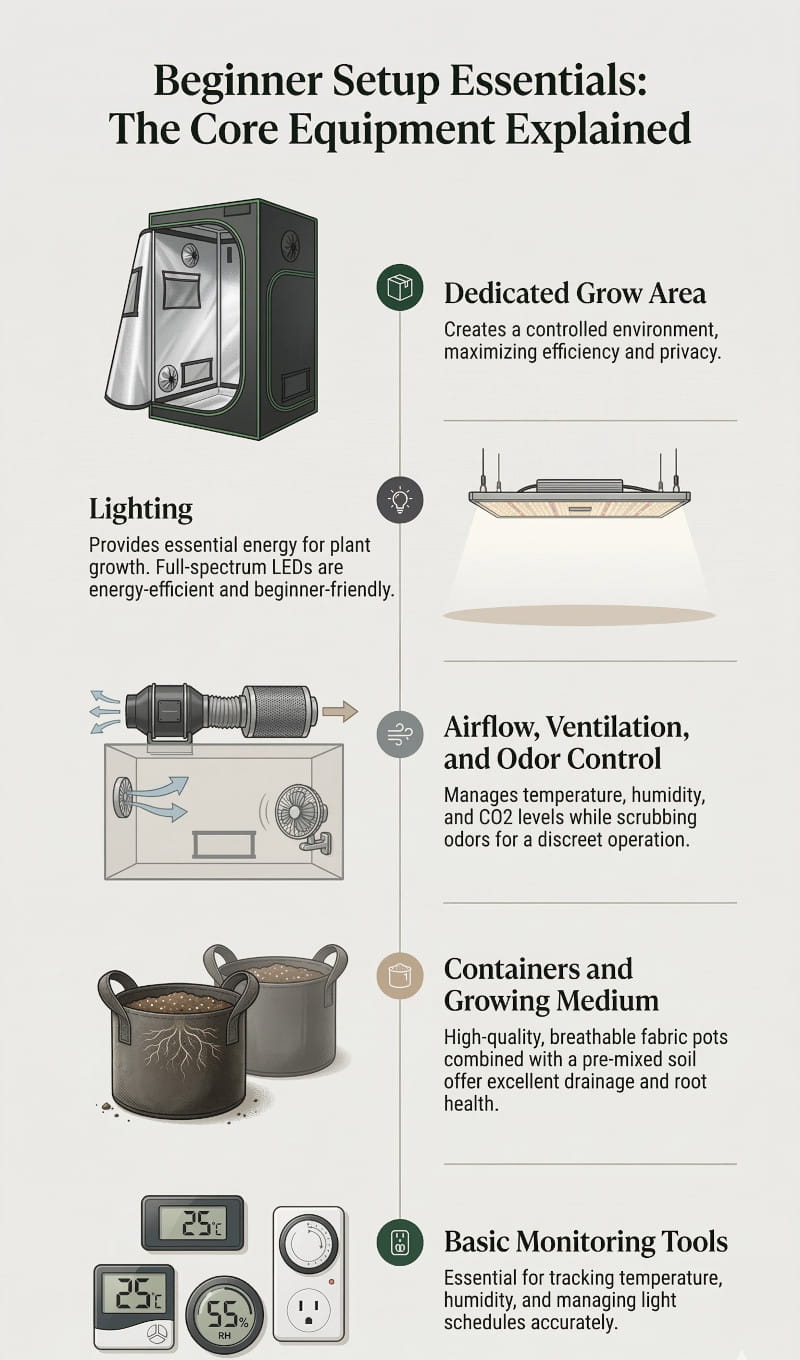
A good beginner setup is about understanding the role of your core equipment. Once you know what each piece does, the process feels much less intimidating.
1. A Dedicated Grow Area (The Tent)
This is your foundation. Most beginners use a grow tent because it comes with built-in reflective walls, structural poles for hanging lights, and ports for ventilation. It creates an intentional, enclosed micro-climate.
2. Lighting
The topic of indoor grow licht cannabis comes up quickly because light is your plant's food. For beginners, full-spectrum LED lights are the gold standard. They run cooler than older HID lights, use less electricity, and are incredibly easy to plug in and hang.
3. Airflow, Ventilation, and Odor Control
Plants need to breathe, and eventually, they will produce a very strong smell. You will need an inline exhaust fan to pull hot, stale air out of the tent, paired with a carbon filter to scrub the intense odors before they leave your house. Add a small oscillating clip fan inside the tent to keep air moving gently over the leaves; this prevents mold and strengthens the stems.
4. Containers and Growing Medium
Keep it simple. Fabric pots are excellent for beginners because they prevent overwatering and allow oxygen to reach the roots. Pair them with a high-quality, light soil mix. Avoid heavy, nutrient-dense soils that can burn young seedlings.
5. Basic Monitoring Tools
You cannot manage what you do not measure. A basic digital thermometer/hygrometer will tell you the temperature and humidity inside your setup. A simple outlet timer will automate your light schedule so you do not have to flip switches manually every day.
How to Set Up and Grow Cannabis Step by Step
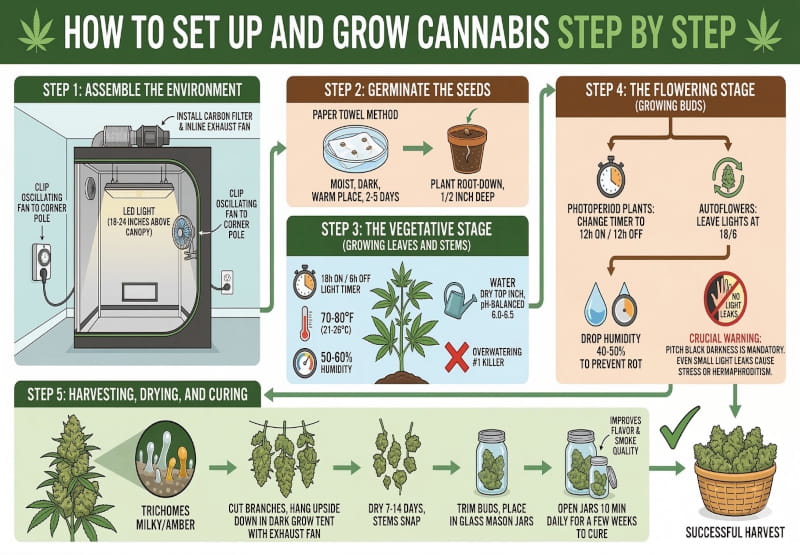
Knowing what gear to buy is only half the battle. Here is how you actually put that setup to use and take your first grow from a seed to a successful harvest.
Step 1: Assemble the Environment
Start by building your grow tent in a clean, dry room. Hang your LED light from the top bars, ensuring it is at the manufacturer's recommended height (usually 18–24 inches above the canopy). Install your carbon filter and inline exhaust fan at the top of the tent to pull hot, smelly air out, and clip your oscillating fan to a corner pole. Plug your light into the wall timer.
Step 2: Germinate the Seeds
There are many ways to start a seed, but the paper towel method is a beginner favorite. Place your seeds between two moist (not soaking wet) paper towels and put them in a dark, warm place. Within 2 to 5 days, a small white taproot will appear. Once it does, carefully plant the seed root-down into a small pot of moist soil, about half an inch deep. We also recommend the fantastic Germinator Seedbooster, especially for older seeds that were stored under bad conditions, this tool is a true must.
Step 3: The Vegetative Stage (Growing Leaves and Stems)
Once your seedling breaks the surface, set your light timer to 18 hours ON and 6 hours OFF. During this stage, your plant is focused purely on growing larger. Keep temperatures around 70-80°F (21-26°C) and humidity around 50-60%. Water the plant only when the top inch of soil feels dry to the touch, and ensure your water is pH-balanced to around 6.0–6.5. Proper pH is a secret to success—it ensures the roots can actually absorb the nutrients in the soil. Overwatering is the #1 killer of beginner plants.
Step 4: The Flowering Stage (Growing Buds)
If you are growing photoperiod plants (like standard feminized seeds), you must force the plant to bloom by changing your light timer to 12 hours ON and 12 hours OFF. If you are growing autoflowers, leave the lights at 18/6. During flowering, humidity should be dropped to around 40-50% to prevent bud rot.
Crucial warning for photoperiods: During those 12 hours of darkness, the tent must be pitch black. Even a small "light leak" from a crack in the tent or a glowing power strip can stress the plant, causing it to stop flowering or turn into a hermaphrodite.
Step 5: Harvesting, Drying, and Curing
Your plant is ready to harvest when the tiny, frosty trichomes on the buds turn from clear to a milky, cloudy white (with a few turning amber). Cut the branches and hang them upside down in your dark grow tent with the exhaust fan running. Let them dry for 7–14 days. Once the stems snap instead of bending, trim the buds and place them in glass mason jars. Open the jars for 10 minutes a day for a few weeks to "cure" them, which drastically improves the flavor and smoke quality.
Why Seed Choice Changes the Setup
Your setup is not just about equipment; it is about matching your plan to the genetics you choose. For many beginners, feminized seeds are a natural place to start. They offer a predictable path, ensuring every plant produces buds (no male plants to ruin the crop). If you are comparing options, Cannapot’s guide on how to choose cannabis seeds explains this perfectly.
Other beginners prefer autoflower seeds. Autoflowers do not require you to change the light schedule to trigger blooming—they flower automatically based on age. This means your setup is essentially "set it and forget it" regarding the light timer. If this sounds appealing, the guide on growing autoflowering cannabis is a must-read.
Keep the First Setup Smaller Than You Think
A lot of first-time growers assume that more gear and more space mean a better harvest. Usually, it just means more things to manage. For beginners, a massive setup often leads to overwhelm.
A smaller setup is the smarter setup. A compact indoor growbox beginner setup or a simple 2x2 or 3x3 foot tent is incredibly easy to organize, understand, and upgrade later. Your first setup is your learning setup. Its job is to help you build clarity and confidence, not complexity.
What a Beginner Should Prioritize First
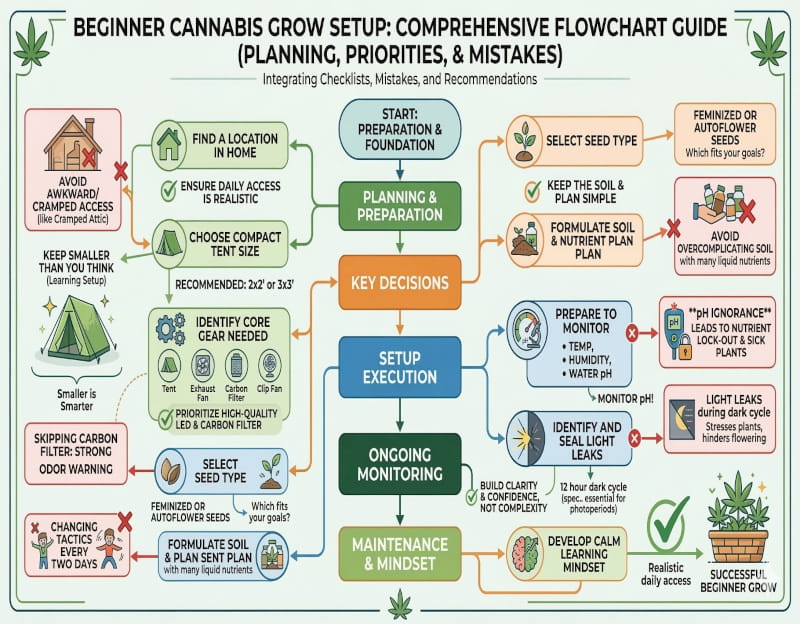
If you want your beginner cannabis grow setup to be successful from day one, prioritize these elements:
-
A realistic indoor space you can access daily.
-
A firm decision between feminized or autoflower seeds.
-
A simple, high-quality LED light and carbon filter instead of a bloated shopping list.
-
An environment that is highly stable, clean, and easy to monitor.
-
A calm learning mindset that avoids changing tactics every two days.
Common Beginner Mistakes That Make Setups Harder
A grow can go sideways before a seed is even planted. Here is what to avoid when planning your setup:
-
Choosing a space that is awkward or inconvenient to access (like a cramped attic).
-
Skipping the carbon filter and underestimating how strong flowering plants smell.
-
Ignoring water pH, leading to nutrient lock-out and sick plants.
-
Allowing "light leaks" into the tent during the 12-hour dark cycle.
-
Overcomplicating the soil with too many liquid nutrients right away.
How This Fits Into the Bigger Growing Journey
Do not treat the setup stage like it has to answer every question for the rest of your growing career. The setup is just the starting line. It creates the conditions for learning what comes next.
Once your setup makes sense, the next questions usually become: how do you begin properly, what stages come after that, and how long does the process take? Cannapot’s guides on germinating cannabis seeds, the cannabis growth cycle, and the cannabis flowering stage all fit naturally after your tent is zipped up and ready to go.
How Cannapot Helps Beginners Build a Better Start
A new grower needs context, not just products. Instead of forcing you to scroll through endless strain names without direction, Cannapot makes it easy to compare seed types, browse trusted breeder collections, and use the Canna Wiki to understand what your choices actually mean.
If you know you want a straightforward start, explore feminized cannabis seeds. If you want a faster, light-schedule-free path, compare autoflowering cannabis seeds. And if you still need clarity, the Canna Wiki gives you a strong foundation to keep learning.
Beginner Cannabis Grow Setup Checklist
Before you order anything, run through this checklist to make sure your foundation is solid:
-
You know exactly where the setup will live in your home.
-
You have chosen a compact, manageable tent size.
-
You understand the core gear needed (Tent, LED light, Exhaust fan, Carbon filter, Clip fan, Pots).
-
You have decided whether feminized or autoflower seeds fit your goals.
-
You are prepared to monitor your temperature, humidity, and water pH.
-
You are keeping the soil and nutrient plan simple.
Frequently Asked Questions About a Beginner Cannabis Grow Setup
Q: What is the best beginner cannabis grow setup?
A: The best setup is a small, manageable indoor grow tent (like a 2x2 or 3x3) equipped with a full-spectrum LED light, an inline exhaust fan with a carbon filter, fabric pots, and a simple soil medium. It should match your available space and keep the learning curve low.
Q: How much does a beginner grow setup cost?
A: A reliable, high-quality beginner setup usually costs between $300 and $500. This covers the tent, LED light, ventilation system, pots, and basic monitoring tools.
Q: Is a small indoor setup better for beginners?
A: Yes. Smaller setups are easier to organize, monitor, climate-control, and improve over time. A small, successful harvest will teach you far more than a massive, failing grow room.
Q: Should beginners start with feminized or autoflower seeds?
A: It depends on your preference. Feminized seeds offer highly predictable growth and maximum yield potential, while autoflower seeds are slightly faster and don't require you to manually change the light cycle to trigger flowering.
Q: What should I read after learning about beginner setup planning?
A: A natural next step is reading about germination, understanding the growth cycle, and learning how to choose the right seeds for your specific space.
A strong beginner cannabis grow setup isn't about turning your first attempt into a massive technical project. It is about building a logical starting point. Equip your space properly, dial in your pH and environment, choose your seeds wisely, and keep your daily routine manageable.
Let your first tent be your classroom. You will improve your yields and techniques through experience, not pressure.
Ready to get started? Browse feminized seeds, compare autoflower seeds, and utilize the Canna Wiki to make your first grow a complete success.